HCH1 DIY IMA Reconditioning


Active Enthusiast
Joined: Dec 2016
Posts: 163
Copy that.
I'll get up early tomorrow and charge to over 144 before reinstalling.
it's been sitting in the 150s most of the discharge,
just dropped to 150 at 3 hours mark in fact. All but the first half hour of the discharge has been between 590 and 570mA
you would have kept charging?
I thought what was best was at least one push to up high and one drain to...your math.

Super Moderator
Joined: Sep 2014
Posts: 5,222
From: Mesa, AZ
LOL... okay. Well, it would have been nice to get a full charge on it...
1805... so you started at 1350?
4.25hr @ about 585 average = 2500mAh with 3.6V to go.
here in AZ, it's EXTREMELY common to see subpacks with capacity that low, so your "reconditioned" pack may have had nothing more done to it than a stick replacement.
Continue as-planned. I recommend another charge, 24 hours, and then get some higher watt bulbs (up to 250W) and see if you can exceed today's computed discharge capacity to 144V. If you do, you can confirm that you improved the pack with the deep discharge.
Active Enthusiast
Joined: Dec 2016
Posts: 163
LOL... okay. Well, it would have been nice to get a full charge on it...
1805... so you started at 1350?
4.25hr @ about 585 average = 2500mAh with 3.6V to go.
here in AZ, it's EXTREMELY common to see subpacks with capacity that low, so your "reconditioned" pack may have had nothing more done to it than a stick replacement.
Continue as-planned. I recommend another charge, 24 hours, and then get some higher watt bulbs (up to 250W) and see if you can exceed today's computed discharge capacity to 144V. If you do, you can confirm that you improved the pack with the deep discharge.
1805... so you started at 1350?
4.25hr @ about 585 average = 2500mAh with 3.6V to go.
here in AZ, it's EXTREMELY common to see subpacks with capacity that low, so your "reconditioned" pack may have had nothing more done to it than a stick replacement.
Continue as-planned. I recommend another charge, 24 hours, and then get some higher watt bulbs (up to 250W) and see if you can exceed today's computed discharge capacity to 144V. If you do, you can confirm that you improved the pack with the deep discharge.
copy that!!
just hit 144volts after 6.5 hours discharging about 567.5mA. (The drop during the first hour was pretty steep so I kicked out some higher values)
Super Moderator
Joined: Sep 2014
Posts: 5,222
From: Mesa, AZ
So that's 3.7Ah. Take a snapshot of your current now and divide that into 1.85Ah - that's how much longer you discharge until you check it again.
Also, very worthwhile to get your tap readings ASAP WHILE the bulb is connected.
Also, very worthwhile to get your tap readings ASAP WHILE the bulb is connected.
Active Enthusiast
Joined: Dec 2016
Posts: 163
For some reason I would have thought the whole thing needed to be mathed out in watts ... but then when I stop and think about why would the pressure matter? a drip or a fire hose, 1 gallon is 1 gallon.
So theoretical or estimated capacity at this time is 5.53AH ?
I hear you on the taps.... just scared to maneuver this 74lb beast while its energized.
What do I need to do to get to them is it really just removing the styrofoam... which is currently on the bottom?
Golly check this thing out.... you probably have see most of it already but its alot in one place!
http://99mpg.com/blog/batterypacksexpose/
Where I'm getting lost is... it appears that there are taps on both the bottom under the styro, but also on the side....with all the STUFF on it....
Last edited by dosmastr; Jun 9, 2017 at 05:06 PM.
Super Moderator
Joined: Sep 2014
Posts: 5,222
From: Mesa, AZ
I rounded up. This does not equate to any extrapolated capacity. This is simply documentation of the capacity to 144V. Its purpose is:
1) establish a baseline against which future discharges to 144V can be compared.
2) establish a safe threshold for continued discharging below 144V (50% of that above 144V).
It has no validity in extrapolating capacity.
What you should see is that the next time you fully charge and discharge to 144V, you will see an increase in computed cap. Granted, it's not quite apples to apples because you didn't fully charge, and you had a wait period before discharging, but it should be close.
Tap voltages?Tap voltages?Tap voltages?Tap voltages?Tap voltages?Tap voltages?Tap voltages?Tap voltages?
Active Enthusiast
Joined: Dec 2016
Posts: 163
I still am not quite sure how to GET TO the taps, the photo appears to show some other parts need to be removed..... I'm unlucky. If i mess with that I'll end up zapping myself.
once I hit the discharge stop time can I let it sit at that SOC until tomorrow?
once I hit the discharge stop time can I let it sit at that SOC until tomorrow?
Super Moderator
Joined: Sep 2014
Posts: 5,222
From: Mesa, AZ
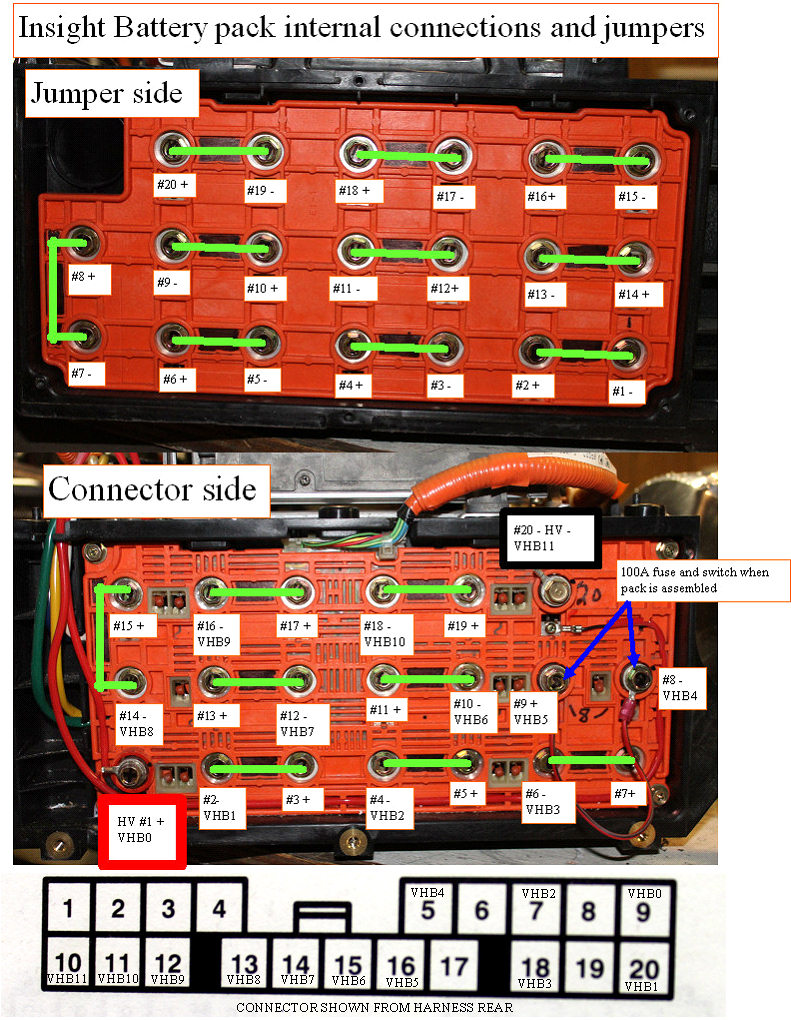
Per my previous post, the connector pictured is the connector at the end of the orange cable on the battery. no maneuvering required.
Per the other thread I linked:, you need to check voltage between these pins:
14-6
6-13
13-5
5-4
1-7
7-2
2-8
8-3
3-9
9-10
That image came from 99mpg.com Very familiar with that site.
Per the other thread I linked:, you need to check voltage between these pins:
14-6
6-13
13-5
5-4
1-7
7-2
2-8
8-3
3-9
9-10
That image came from 99mpg.com Very familiar with that site.
Active Enthusiast
Joined: Dec 2016
Posts: 163
Per my previous post, the connector pictured is the connector at the end of the orange cable on the battery. no maneuvering required.
Per the other thread I linked:, you need to check voltage between these pins:
14-6
6-13
13-5
5-4
1-7
7-2
2-8
8-3
3-9
9-10
That image came from 99mpg.com Very familiar with that site.
Per the other thread I linked:, you need to check voltage between these pins:
14-6
6-13
13-5
5-4
1-7
7-2
2-8
8-3
3-9
9-10
That image came from 99mpg.com Very familiar with that site.
By the 3.5 hours I should have only 25 minutes left, but the batt is still at 136v and 540mA
I thought it would be closer to where HA said to stop TBH


