My newest HCH-II Mods
#1
 12-10-2006, 04:38 PM

Join Date: Aug 2006
Location: San Francisco Bay Area
Posts: 652
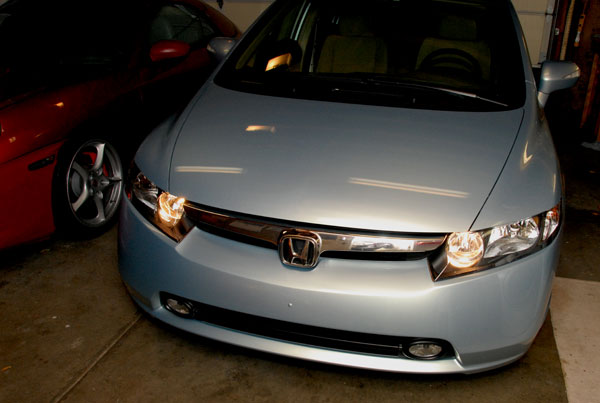
It was nice and rainy this weekend, so I decided to add some more modifications to my HCHII.
This weekend was Safety Modification weekend.
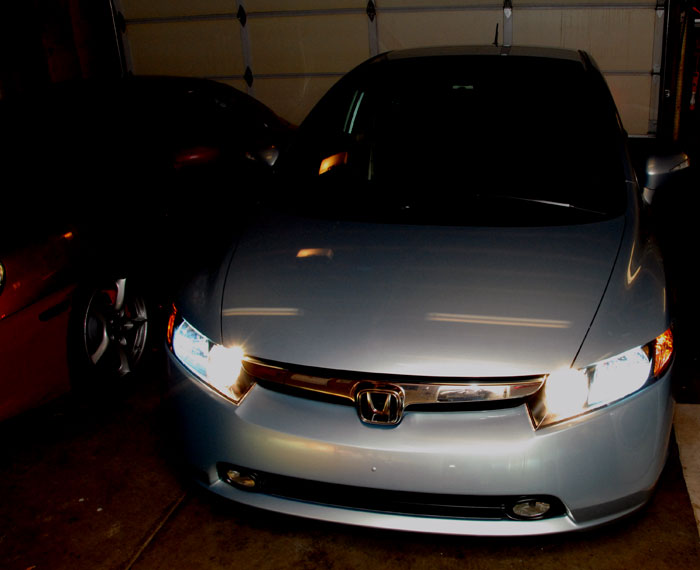
The first thing I did was to replace the stock 55W Sylvania Halogen highbeam lamps with a pair of PIAA Xtreme white blubs. They are slightly higher wattage (60W) but most importantly have a 4000K color and use Xenon gas in the bulb capsule. They are not HID bulbs, but have a nice balanced white color which matches the HID low beams very well.
Here is a picture of the car with the front bumper off (for the other modifications), and you can see the new bulbs.

The next project was to replace the wimpy horn with a horn that had more presence and demanded attention when used.
For the replacements I chose a set of Hella "Super Horns". These horns fit quite nicely where the stock horn was, and use the stock wiring with the addition of a short new harness. These horns have a low and high frequency horn and are rated at 118db at 3 feet. They are modeled after the models that Hella produced for the air-cooled 911s, and do get your attention.

Lastly, I added the Honda fog lamps. This add-on kit is truly a complete product, and is fairly easy to install. Much of the wiring is already in place in the car, and simply needs the addition of 3 sub-harnesses, and a new multi-function light switch. The most difficult part of the installation was the cutting of holes in the front bumper cover. Why Honda did not just put punch-outs for the lamps, I don't understand, especially since most everything else is held in with plastic clips.
I did change the bulbs out in the Fog lamps to Hella Optilux yellow lamps. Yellow lamps are very good for driving in fog or rain.

All in all it took 4 hours to complete these updates. Now it is much easier for my wife to see at night in the car, and to be seen and heard!
This weekend was Safety Modification weekend.
The first thing I did was to replace the stock 55W Sylvania Halogen highbeam lamps with a pair of PIAA Xtreme white blubs. They are slightly higher wattage (60W) but most importantly have a 4000K color and use Xenon gas in the bulb capsule. They are not HID bulbs, but have a nice balanced white color which matches the HID low beams very well.
Here is a picture of the car with the front bumper off (for the other modifications), and you can see the new bulbs.
The next project was to replace the wimpy horn with a horn that had more presence and demanded attention when used.
For the replacements I chose a set of Hella "Super Horns". These horns fit quite nicely where the stock horn was, and use the stock wiring with the addition of a short new harness. These horns have a low and high frequency horn and are rated at 118db at 3 feet. They are modeled after the models that Hella produced for the air-cooled 911s, and do get your attention.
Lastly, I added the Honda fog lamps. This add-on kit is truly a complete product, and is fairly easy to install. Much of the wiring is already in place in the car, and simply needs the addition of 3 sub-harnesses, and a new multi-function light switch. The most difficult part of the installation was the cutting of holes in the front bumper cover. Why Honda did not just put punch-outs for the lamps, I don't understand, especially since most everything else is held in with plastic clips.
I did change the bulbs out in the Fog lamps to Hella Optilux yellow lamps. Yellow lamps are very good for driving in fog or rain.
All in all it took 4 hours to complete these updates. Now it is much easier for my wife to see at night in the car, and to be seen and heard!
#2
12-10-2006, 07:43 PM

Hey great job! I too have HID's and changed my high beams to something more whiter... Do you have pictures of your DRL's (daytime running lights) w/the new bulbs? Since i changed high beams, i haven't seen too much of a difference (in terms of looks) since the bulbs are running in a low wattage when driving, but of course they're brighter and whiter when actually using the high beams. I thought about getting the Piaa tera but since it's not common in many auto stores and if one goes out, i would have to order them, which i don't have patients for.


#6
12-12-2006, 09:22 AM

Looks great, how about some night shots of the HIDs, Highs, and Fogs.
Also if you can do an audio clip of the horn it would be much appreciated.
What are the model numbers of the fog light bulbs and high beam bulbs, pretty sure they are H11 fogs and 9005 high beams?
Sorry for the list, I am just excited to see someone doing modifications to their hybrid, plus all the upgrades are things that Honda missed the boat on doing right.
Thanks
Last edited by ssj_chris; 12-12-2006 at 09:50 AM.
#7
12-12-2006, 11:46 AM
Join Date: Aug 2006
Location: San Francisco Bay Area
Posts: 652
I'll have to find some time to make a sound clip of the horns.
night shots of the lights are also something I will have to find time to do. You do have the bulb types correct.
night shots of the lights are also something I will have to find time to do. You do have the bulb types correct.
#8
12-12-2006, 11:57 AM

I HAVE to get that HID kit you got, Gary...looks fantastic. Too bad there is no way I could do it by myself..I'll have to find a trustable shop to do it......
Good call on the Hella horns as well, pretty cool
Good call on the Hella horns as well, pretty cool
#9
12-12-2006, 02:17 PM

How hard was it get the front clip off? What was invovled? Any special tools? The one thing that I want to do ASAP is replace the !@#$% horn. Any help would be greatly appreciated.
#10
12-12-2006, 02:44 PM
Join Date: Aug 2006
Location: San Francisco Bay Area
Posts: 652
It is just held on with a bunch of expansion clips and 2 #2 philips screws. First take off the engine bulkhead beauty cover, then the bumper cover.
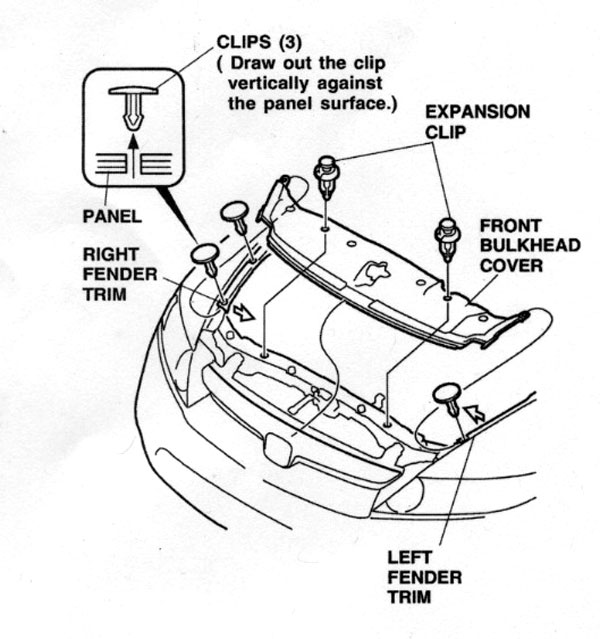
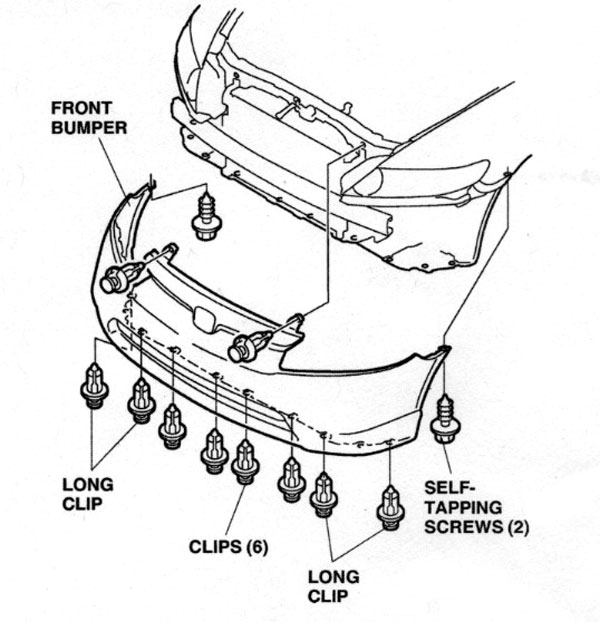
I found that a nail puller handle works great to pop out the expansion clips. If you don't have one of those, a small flat bladed screwdriver will work just fine. On both sides of the cover there are clips molded into the bumper cover that hold the cover to the front fenders. You have to give them a tug on the cover to get them to pop loose.
It is also good to have someone help you handle the cover once it is loose so you don't scratch it. Put a big blanket on towel under the bumper so if it falls, it won't get scratched.
The horn power line connector is just the hot line, so you will need to make a little wiring harness that has a ground line with a grommet connector for the return line. I just attached it to the bolt that holds the horn brackets on. The hot line for the horns is off a relay, and has more than enough amperage to support the 2 replacement horns. No need to wire a separate relay and power line directly to the battery.


