Rear turn signal bulbs and LED replacements
#31
 05-15-2009, 11:22 AM


I just purchased new front and rear led which flash excessively fast until I replace the turn signal flasher with a electronic model. I would appreciate if anyone could advise me on how to get at this turn signal assembly
Thanking anyone in advance
Tim
#32
05-15-2009, 05:42 PM
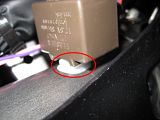
I just finished crawling inside the vehicle. the flasher is reachable with a lot of effort as described in the picture.
You have to turn the vehicle on with the turn signal operating and feel for the flasher. It has a tab which you push in and pull the connector off. It is virtually impossible to see.
Once off it is a 9 pin custom flasher that flashes both the turn signals and the 4 way flasher. I disassembled it and noted 2 separate relays and a small electronic board, it does not appear you can adjust anything.
So now I am stuck cannot switch, no adjustment and I do not want to add a load resistor.
Anyone have any ideas
Tim
#33
05-15-2009, 08:02 PM

Try v-leds.com, they have electronic flasher it will fix the flash problem. It should be a direct replacement.
http://v-leds.com/BlinkerWarning-Fix...-p4481146.html
http://v-leds.com/BlinkerWarning-Fix...-p4481146.html
#34
05-21-2009, 07:07 PM
just received the led flasher from superbrightleds.com. Other then ripping my hands apart to get out old flasher and install new flasher everything went well.
I installed 3 watt single led in rear turn signals and dual 3 watt leds in front turn signals which double as marker lights.
to install the front bulbs you remove the 2 liner clips from the front wheel well and pull away the liner to get access to the turn signal bulbs.
I went from 4 times 37 watt bulbs with hazard lights on, to 4 times 3 watt bulbs or from 148 watt consumption in emergency mode to about 12 watts.
from a safety point of view the battery has around 50 usable amps before going into drain mode. This means with the old bulbs I could run my hazard lights for about 4 hours before severely draining the battery, to now about a little over 2 days with the led bulbs.
I am going to install 2 relays to deactivate the drl's and replace them with an electric web drl module which will use the new led's as drl's. This will reduce my idle consumption when waiting in border lines from 72 watts to a little under 6 watts, subsequently I should have the engine starting less when stopped.
#35
05-23-2009, 11:46 AM

I did this yesterday. Here is my DIY with pictures.
Got my Electronic LED Flasher for my LED turn signals and decided to do a DIY since it seemed fairly easy and I had a half day giving me enough daylight out in case I run into a snag.
Tools needed for DIY:
__________________________________________________
CLICK ON IMAGES TO ENLARGE
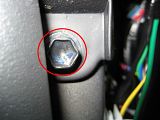
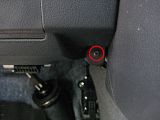
1. Like the DIY for the LED Glove Box, there is a 10mm bolt (left side) and a screw (right side). You'll need to move the cover out of the way to access the bolt. So you'll need a 10mm ratchet wrench and philips screwdriver for the screw.
2. Now that the screw and bolt is removed, pull on the bottom panel until all clips are dislodged. The cable for the hood will prevent you from removing it from the car. You can probably unclip the cable or something but I left it on there.
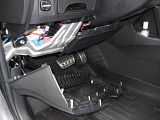
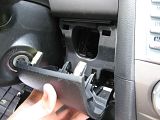
3. Once the bottom panel is off, you can remove the two panels to the side of the steering wheel. Both are held in by clips. There are no screws. Just pull them out and place them out of the way.
4. Now we get to the instrument panel. There are two clips at the top of the panel.
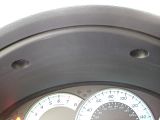
5. Push the middle in with a screwdriver or something thin. Than take a flathead screwdriver or your fingernails and pull it out.
6. Once the pins are removed, you can remove the instrument panel cover. Just pull it out and place it out of the way.
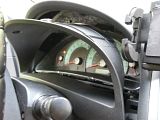
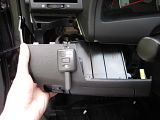
7. The instrument cluster should now be visible. There are four screws; 2 on top and 2 on the bottom. Just use your philips screwdriver and remove them. Try not to drop them. I dont know where they would end up if it drops.
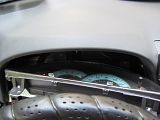
8. There is no need to unplug the instrument cluster. Just move the instrument cluster to the right side (radio) so that its out of the way. This is where it took the longest for me. On the left side, you'll see the DENSO flasher module.
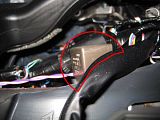
9. First unplug the cable. Either use your fingers to squeeze the tab (you'll have to do it blind and feel for it). I used a flathead to help me as the tab was too small for my fingers and I couldnt get a good grip (module is from electronic LED flasher and for reference on where the tab is located).
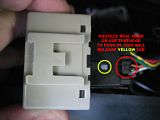
10. The flasher module is held in place by a white clip of some sort. I had problems trying to remove the flasher module and ended up breaking a tab at the bottom of the flasher module (see electronic flasher module above - since it looks like a "M", the part that broke off was the middle).
11. Once you swapped the flasher module with the electronic LED flasher module, plug the cable into the electronic LED flasher. Before you put everything back, place a LED bulb into one of the rear turn signals (if you havent done so) and make sure everything works by inserting key into ignition and using the turn signal. You dont want to put everything back only to find out something is wrong and you have to take it all apart again. Once you have confirmed that it works, put the flasher back onto the clip. Now that everything is good, put everything back in reverse order.
12. As for the clip from the instrument panel cover, since the center was pushed in for removal, you'll have to push the pin out for when you are inserting it back after everything is done.
End result, fully functional LED turn signals without splicing/tapping into factory wires. Even if you were to change back to regular filament bulbs, the electronic LED flasher will work with it as well. When you unlock/lock your doors, the parking lights will flash for confirmation. The ONLY thing that does not work is hazard lights with NO key. Hazard lights ONLY work if the key is turned to ON (right before you turn to ignition) or if the car is running. That is the only time the hazard will come on.

To gain access to the parking light bulbs, you'll have to go through the wheel well. No way to get to them through the engine bay.
Video to come.
Got my Electronic LED Flasher for my LED turn signals and decided to do a DIY since it seemed fairly easy and I had a half day giving me enough daylight out in case I run into a snag.
Tools needed for DIY:
- Fingers/hands
- Philips Screwdriver
- Flathead Screwdriver
- 10mm Ratchet Wrench
__________________________________________________
CLICK ON IMAGES TO ENLARGE
1. Like the DIY for the LED Glove Box, there is a 10mm bolt (left side) and a screw (right side). You'll need to move the cover out of the way to access the bolt. So you'll need a 10mm ratchet wrench and philips screwdriver for the screw.


2. Now that the screw and bolt is removed, pull on the bottom panel until all clips are dislodged. The cable for the hood will prevent you from removing it from the car. You can probably unclip the cable or something but I left it on there.

3. Once the bottom panel is off, you can remove the two panels to the side of the steering wheel. Both are held in by clips. There are no screws. Just pull them out and place them out of the way.


4. Now we get to the instrument panel. There are two clips at the top of the panel.

5. Push the middle in with a screwdriver or something thin. Than take a flathead screwdriver or your fingernails and pull it out.


6. Once the pins are removed, you can remove the instrument panel cover. Just pull it out and place it out of the way.

7. The instrument cluster should now be visible. There are four screws; 2 on top and 2 on the bottom. Just use your philips screwdriver and remove them. Try not to drop them. I dont know where they would end up if it drops.


8. There is no need to unplug the instrument cluster. Just move the instrument cluster to the right side (radio) so that its out of the way. This is where it took the longest for me. On the left side, you'll see the DENSO flasher module.

9. First unplug the cable. Either use your fingers to squeeze the tab (you'll have to do it blind and feel for it). I used a flathead to help me as the tab was too small for my fingers and I couldnt get a good grip (module is from electronic LED flasher and for reference on where the tab is located).

10. The flasher module is held in place by a white clip of some sort. I had problems trying to remove the flasher module and ended up breaking a tab at the bottom of the flasher module (see electronic flasher module above - since it looks like a "M", the part that broke off was the middle).

11. Once you swapped the flasher module with the electronic LED flasher module, plug the cable into the electronic LED flasher. Before you put everything back, place a LED bulb into one of the rear turn signals (if you havent done so) and make sure everything works by inserting key into ignition and using the turn signal. You dont want to put everything back only to find out something is wrong and you have to take it all apart again. Once you have confirmed that it works, put the flasher back onto the clip. Now that everything is good, put everything back in reverse order.
12. As for the clip from the instrument panel cover, since the center was pushed in for removal, you'll have to push the pin out for when you are inserting it back after everything is done.

End result, fully functional LED turn signals without splicing/tapping into factory wires. Even if you were to change back to regular filament bulbs, the electronic LED flasher will work with it as well. When you unlock/lock your doors, the parking lights will flash for confirmation. The ONLY thing that does not work is hazard lights with NO key. Hazard lights ONLY work if the key is turned to ON (right before you turn to ignition) or if the car is running. That is the only time the hazard will come on.


To gain access to the parking light bulbs, you'll have to go through the wheel well. No way to get to them through the engine bay.
Video to come.
#36
05-23-2009, 11:53 AM
just received the led flasher from superbrightleds.com. Other then ripping my hands apart to get out old flasher and install new flasher everything went well.
I installed 3 watt single led in rear turn signals and dual 3 watt leds in front turn signals which double as marker lights.
to install the front bulbs you remove the 2 liner clips from the front wheel well and pull away the liner to get access to the turn signal bulbs.
I went from 4 times 37 watt bulbs with hazard lights on, to 4 times 3 watt bulbs or from 148 watt consumption in emergency mode to about 12 watts.
from a safety point of view the battery has around 50 usable amps before going into drain mode. This means with the old bulbs I could run my hazard lights for about 4 hours before severely draining the battery, to now about a little over 2 days with the led bulbs.
I am going to install 2 relays to deactivate the drl's and replace them with an electric web drl module which will use the new led's as drl's. This will reduce my idle consumption when waiting in border lines from 72 watts to a little under 6 watts, subsequently I should have the engine starting less when stopped.
I installed 3 watt single led in rear turn signals and dual 3 watt leds in front turn signals which double as marker lights.
to install the front bulbs you remove the 2 liner clips from the front wheel well and pull away the liner to get access to the turn signal bulbs.
I went from 4 times 37 watt bulbs with hazard lights on, to 4 times 3 watt bulbs or from 148 watt consumption in emergency mode to about 12 watts.
from a safety point of view the battery has around 50 usable amps before going into drain mode. This means with the old bulbs I could run my hazard lights for about 4 hours before severely draining the battery, to now about a little over 2 days with the led bulbs.
I am going to install 2 relays to deactivate the drl's and replace them with an electric web drl module which will use the new led's as drl's. This will reduce my idle consumption when waiting in border lines from 72 watts to a little under 6 watts, subsequently I should have the engine starting less when stopped.
#37
05-23-2009, 06:08 PM
my hazard lights work regardless of ignition, whether it be on or off or in parked position.
I bought my relay unit from superbrightleds.com which was about 4 dollars cheaper. I noted that the end digit was 04 where as I have seen identical unit ending with an end digit of 08.
Of note I no longer have the annoying seat belt reminder beeper, it does state in their sight at superbright that you will loose the park confirmation beep, I guess they threw in the seatbelt off chime for no charge.
If you are a little smaller then me at you should be able to lie down in the foot compartment and reach the relay and disengage it without taking apart the dash.
Now to figure out how to disable the drl's so I can replace them with the drl module from web electric and use my 3 watt amber lights as drl's and only use 6 watts of power.
Tim
#38
05-23-2009, 08:24 PM
Darn, I might have to get the C18-08. I rather have the hazards than confirmation. I have viper alarm, so it will beep. I thought it was the flashing of parking lights that wouldnt work.
#39
05-26-2009, 08:22 AM

What parking/turn signal bulbs are everyone using? Can you provide links and whether you think they are as bright as the standard filament bulbs? The brightest I've found are the 150 lumen LED parking/turn signal bulbs from V-LED. Also, I'm wondering since they are 7W if they won't require replacing the flasher module since their current draw might be high enough?
Russ
Russ


