DIY: Evaporator Core Replacement


Thread Starter
|
Enthusiast
Joined: Jun 2013
Posts: 28
Part1:A long one but will surely help some who must do it and hasn’t done it before. So, my car’s AC wasn’t working last year. I took it to a shop and the technician said there was almost no R134a but could not see any signs of a leak. He recharged it. This year AC went out again in August. I bought an AC manifold gauge set and checked the pressure - again almost no pressure! I changed the Schrader valves and recharged it. A few weeks later no AC again and I saw oily residue right under the ac drain which confirmed a leaky evaporator. I called the dealer, and he ran some numbers and gave me an estimate of $3400! And I am like “Yeah bro…let me go and find a cash machine”. It took me about 3 days to do it and probably $200-$225 worth of supplies. I think you can do it over the weekend. I had some guidance but nothing step by step and most importantly I spent too much time on a bunch of tricky things and if you know the tricks - it’s easy and won’t frustrate you too much.
Disclaimer: Neither me nor Electric Vehicle Forum is responsible if anything goes wrong: try it on your own risk.
Tools:
10mm, 12mm, 14mm sockets and keys
4mm hex Allen wrench
trim removal set or tools
Hose removal pliers
Faster removal tool
Some screwdrivers flat and Phillips
Parts:
AC Expansion valve Denso 475-2068
AC evaporator core Denso 476-0035
This was done on a Camry hybrid. For non-hybrid you may have to disconnect fewer connectors or at worst it may be the same.
Before you start:
) Park your car with wheels straight. If you happen to be in a garage park your car at an angle so that you have plenty of space on both sides of the front doors as you will be on your knees a lot and opening the doors all the way will give you much-needed space.
ii) Phillips screws are all the same but 10mm bolts are different types. They do have markings on the head (see below). Make sure you label them where they come from or take pictures or best put them back or leave them with the part they came from.
iii) As you remove parts, put them in order as you will need to put them back in the reverse order to avoid the headache (all the trim pieces fit in an order).
iv) Make sure your AC system is free of R134a. if you have some left, get it empty by an ac technician.
v) Remove the front and left weatherstripping just enough so that you have the front cleared then fold them and put them on the roof of the car.
vi) I am going to call the instrument panel safety pad as dash pad and the unit that contains the evaporator/heater core/PTC heater as AC unit.
Removing Trim inside:
1.Remove two Phillips screws by turning steering wheel 90 degrees as shown in pics. Then remove the steering column cover. Two push type pins at the back - just pull the top one up and bottom one down. (I didn’t do it as I forgot to remove Phillips screws and by the time I realized the steering wheel was locked and it was too late to reconnect the battery).


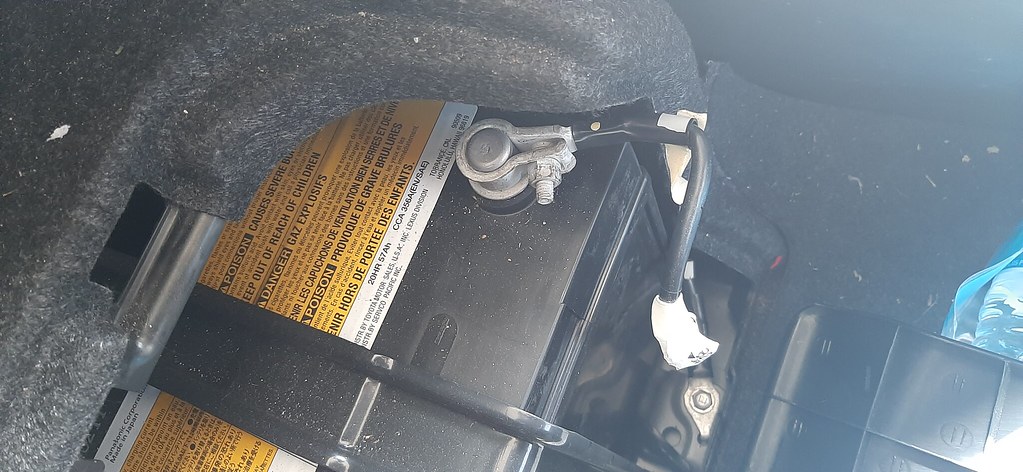
2.Disconnect the negative terminal of 12V battery. In my hybrid, battery is in the trunk. For non-hybrid it will be under the hood.
3.Remove these two trim pieces – pull straight towards you.


4.Remove console box assembly. Open the console box storage. Remove the liner at the bottom. There are two 10mm bolts – remove them.

Front end has two Phillips screws – remove them.

Now pull it up at the back (where you had two screws) to release clips and then slide it back to disconnect the front end.
Remove the shift lever **** (just rotate it anticlockwise to remove) and pull this piece of trim (upper console rear panel) straight up. There will be two connectors to disconnect (heated seats and 12V)


5.This piece of trim – pull it straight up

6.Remove two Phillips screws (one shown) and pull the storage thingy (upper console panel) out. There will be two connectors to disconnect.


7.Remove front door scuff plate on both sides. Simply pull this straight up (has 3 push pins at the back).


These two trim pieces (cowl side trim) will be on the drivers side and passenger side. You need to unscrew the black piece and then just pull the pieces out gently.


Disclaimer: Neither me nor Electric Vehicle Forum is responsible if anything goes wrong: try it on your own risk.
Tools:
10mm, 12mm, 14mm sockets and keys
4mm hex Allen wrench
trim removal set or tools
Hose removal pliers
Faster removal tool
Some screwdrivers flat and Phillips
Parts:
AC Expansion valve Denso 475-2068
AC evaporator core Denso 476-0035
This was done on a Camry hybrid. For non-hybrid you may have to disconnect fewer connectors or at worst it may be the same.
Before you start:
) Park your car with wheels straight. If you happen to be in a garage park your car at an angle so that you have plenty of space on both sides of the front doors as you will be on your knees a lot and opening the doors all the way will give you much-needed space.
ii) Phillips screws are all the same but 10mm bolts are different types. They do have markings on the head (see below). Make sure you label them where they come from or take pictures or best put them back or leave them with the part they came from.
iii) As you remove parts, put them in order as you will need to put them back in the reverse order to avoid the headache (all the trim pieces fit in an order).
iv) Make sure your AC system is free of R134a. if you have some left, get it empty by an ac technician.
v) Remove the front and left weatherstripping just enough so that you have the front cleared then fold them and put them on the roof of the car.
vi) I am going to call the instrument panel safety pad as dash pad and the unit that contains the evaporator/heater core/PTC heater as AC unit.
Removing Trim inside:
1.Remove two Phillips screws by turning steering wheel 90 degrees as shown in pics. Then remove the steering column cover. Two push type pins at the back - just pull the top one up and bottom one down. (I didn’t do it as I forgot to remove Phillips screws and by the time I realized the steering wheel was locked and it was too late to reconnect the battery).
2.Disconnect the negative terminal of 12V battery. In my hybrid, battery is in the trunk. For non-hybrid it will be under the hood.
3.Remove these two trim pieces – pull straight towards you.
4.Remove console box assembly. Open the console box storage. Remove the liner at the bottom. There are two 10mm bolts – remove them.
Front end has two Phillips screws – remove them.
Now pull it up at the back (where you had two screws) to release clips and then slide it back to disconnect the front end.
Remove the shift lever **** (just rotate it anticlockwise to remove) and pull this piece of trim (upper console rear panel) straight up. There will be two connectors to disconnect (heated seats and 12V)
5.This piece of trim – pull it straight up
6.Remove two Phillips screws (one shown) and pull the storage thingy (upper console panel) out. There will be two connectors to disconnect.
7.Remove front door scuff plate on both sides. Simply pull this straight up (has 3 push pins at the back).
These two trim pieces (cowl side trim) will be on the drivers side and passenger side. You need to unscrew the black piece and then just pull the pieces out gently.
Last edited by alpha_1976; Oct 27, 2022 at 07:27 AM.
Thread Starter
|
Enthusiast
Joined: Jun 2013
Posts: 28
Part 2:8.Plastic cover under the glove box (lower instrument finish panel) has four tabs that you need to push by a screwdriver to get out. Then remove the glove box by pulling it through.


9.Finally remove this piece (lower instrument panel) by pulling straight towards you after you remove 4 Phillips screws three on the top and one bottom left and one 10mm bolt on the right. At the back there will be a connector.


 shifter

10.Remove these two trims (console box inserts) (left and right). Remove Phillips screws and then pull out straight towards you


11.Pull this piece out. It will have a 10mm bolt on the left bottom. This will have cable release for the hood. Just pull the cable out from the slot.

12.On the driver’s side pull this piece that has eco and gas button again straight out. Two connectors to disconnect.

13.This will be exposed and has some type of diode in it. Not connected anywhere just in case it confuses you later.
14.Remove this metal piece – just a Phillips screw and notice how it holds two floor carpet brackets on both sides.


15.Remove the two floor carpet brackets on both sides (each has three push pins like the one shown below)

16.disconnect the connector on the inside

9.Finally remove this piece (lower instrument panel) by pulling straight towards you after you remove 4 Phillips screws three on the top and one bottom left and one 10mm bolt on the right. At the back there will be a connector.
shifter10.Remove these two trims (console box inserts) (left and right). Remove Phillips screws and then pull out straight towards you
11.Pull this piece out. It will have a 10mm bolt on the left bottom. This will have cable release for the hood. Just pull the cable out from the slot.
12.On the driver’s side pull this piece that has eco and gas button again straight out. Two connectors to disconnect.
13.This will be exposed and has some type of diode in it. Not connected anywhere just in case it confuses you later.
14.Remove this metal piece – just a Phillips screw and notice how it holds two floor carpet brackets on both sides.
15.Remove the two floor carpet brackets on both sides (each has three push pins like the one shown below)
16.disconnect the connector on the inside
Last edited by alpha_1976; Oct 27, 2022 at 07:28 AM.
Thread Starter
|
Enthusiast
Joined: Jun 2013
Posts: 28
Part 3:17.Remove the air duct (black) for the back side (just pull it out gently)

18.Pull the trim piece that has control for mirror adjustments. A connector to disconnect.

19.Time to remove knee airbag on the driver side. Before you do that go back and make sure you have disconnected the negative terminal as in step 2 and there is no way it can touch the negative post back somehow. If you are just removing the negative terminal now wait for about 5 minutes before you disconnect airbag connector.
This has four 10mm bolts.
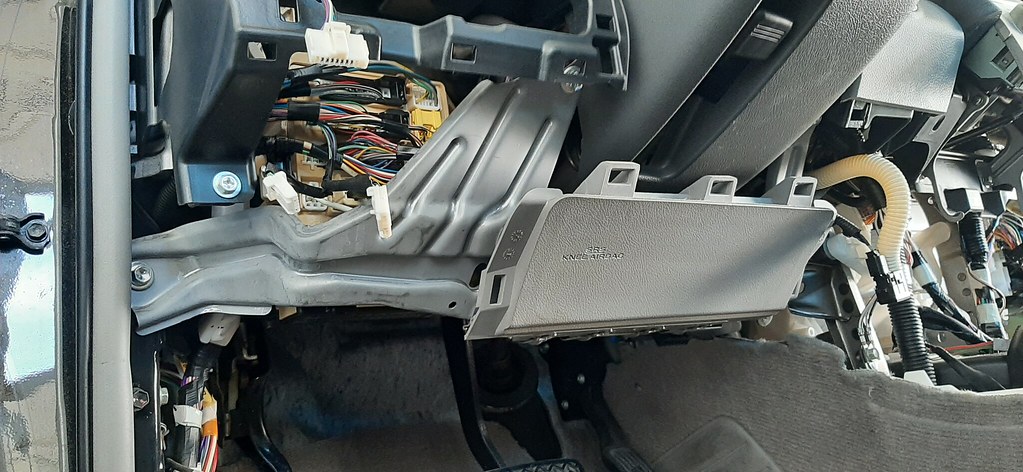


At the back there are two connectors to disconnect. OBD port which you can just pull out of the slot, and you have to disconnect yellow airbag connector (can be seen on the right).

Trick to remove airbag connector is that you must release the black tab by pulling it straight up. Use a flat head screwdriver and pull the black tab up on both ends gently. Once the black tab is up you can remove the airbag connector.


20.Take the center vent/air duct or register out. Pull straight out. A connector at the back.


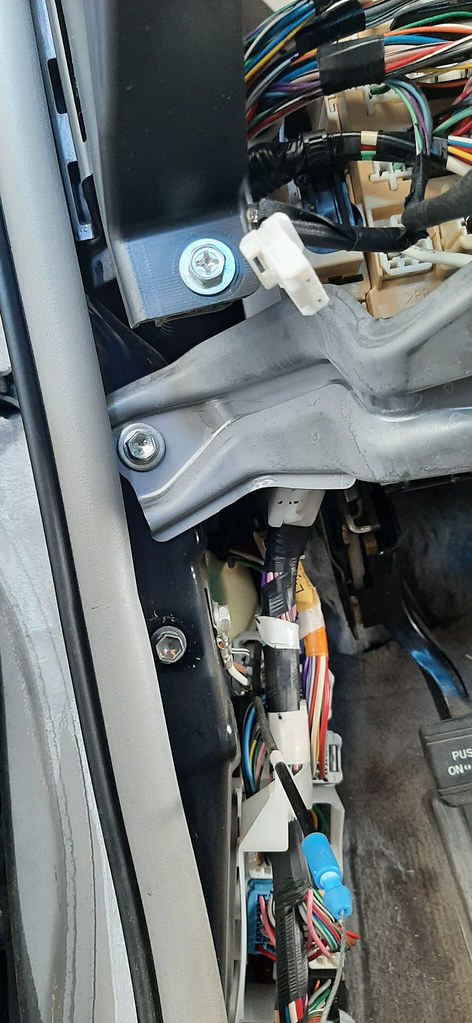
21.Navigation unit has four 10mm bolts. You can see top ones in the pic above after you remove center vents. Remaining two are under the navigation unit. After removing them you must pull the unit straight out towards you. Notice how some slots may not have anything connected at the back depending on options.


22.You will also need to disconnect this (light brown to white connector) as part of the wiring will stay with the reinforcement bar

18.Pull the trim piece that has control for mirror adjustments. A connector to disconnect.
19.Time to remove knee airbag on the driver side. Before you do that go back and make sure you have disconnected the negative terminal as in step 2 and there is no way it can touch the negative post back somehow. If you are just removing the negative terminal now wait for about 5 minutes before you disconnect airbag connector.
This has four 10mm bolts.
At the back there are two connectors to disconnect. OBD port which you can just pull out of the slot, and you have to disconnect yellow airbag connector (can be seen on the right).
Trick to remove airbag connector is that you must release the black tab by pulling it straight up. Use a flat head screwdriver and pull the black tab up on both ends gently. Once the black tab is up you can remove the airbag connector.
20.Take the center vent/air duct or register out. Pull straight out. A connector at the back.
21.Navigation unit has four 10mm bolts. You can see top ones in the pic above after you remove center vents. Remaining two are under the navigation unit. After removing them you must pull the unit straight out towards you. Notice how some slots may not have anything connected at the back depending on options.
22.You will also need to disconnect this (light brown to white connector) as part of the wiring will stay with the reinforcement bar
Last edited by alpha_1976; Oct 27, 2022 at 07:30 AM.
Thread Starter
|
Enthusiast
Joined: Jun 2013
Posts: 28
Part 4:23.To remove tweeters you need to pull them straight up. Be careful and don’t scratch the dash pad (pull them at the arrow). Then remove the speakers – two 10mm bolts and disconnect the connector.


Also disconnect a bunch of connectors shown below as well as disengage a few clips to free the wires


24.Pull the clock trim piece in the center. Pull straight up. Two connectors to disconnect.


25.To remove the trim piece that covers the inside of the instrument panel (instrument cluster finish panel), you need to remove two push pins that are on the top. Lower the steering wheel to have enough space (by simply adjusting the steering by moving the steering wheel adjuster lever). To be able to remove them, you need to take a flat head screwdriver and push the center round piece in the clip shown below

then pull the piece straight out (two push pins at the bottom)
To remove combination meter assembly, remove two Philp screws


At the back there are two connectors to disconnect


26.To remove push start, just pull the piece straight out. At the back there will be one connector to disconnect.


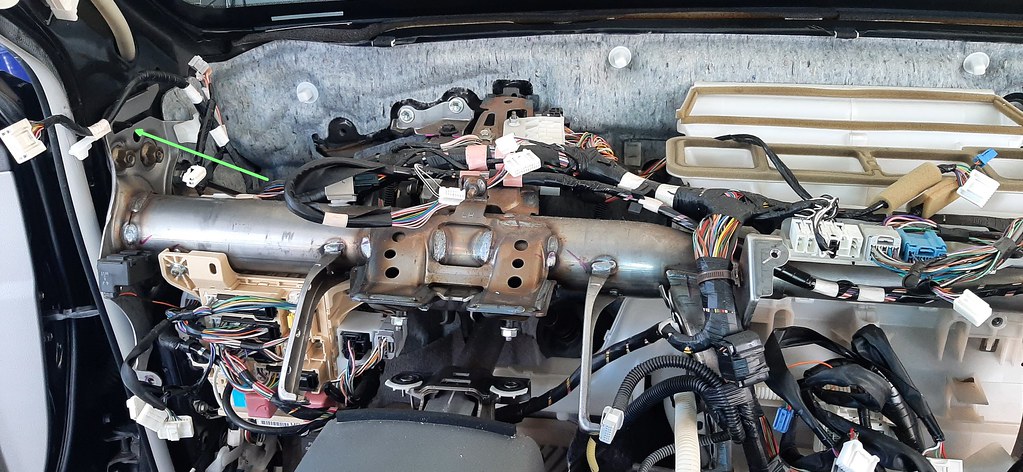
27.Now we need to drop the steering column. To do this you need to loosen two 12 mm bolts shown below (the right side one is not shown). Do not remove completely.

Now remove this 12mm bolt (shiny one pretty much in the center of the pic) which attaches steering column to the reinforcement bar. This is hard to remove if you are alone. If you have a helper, ask him/her to sit on the driver side from the passenger side (so that you have enough space to work) and press brake pedal hard. Then you can remove 12mm bolt using a socket and remove it at ease.

Then you can remove the above two 12mm bolts all the way and drop the steering wheel.
Caution: Don’t overextend the steering wheel as it may cause some damage. Just enough to put it on the edge of the seat or better put it on a ft-height stool right under the steering wheel and leave it there. There is still a bunch of wires connected and you can’t drop it all the way to the floor so please check that. I marked the alignment (with power steering shaft assembly) with paint but it wasn’t needed as I never separated them. All you need is the bottom paint mark though even if you do.
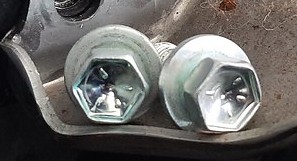
28.Remove wiper arms. There are two 14mm bolts to remove. Even though they have markings on them place left one on the left side and right one on the right side so that you know which one goes where.
Also disconnect a bunch of connectors shown below as well as disengage a few clips to free the wires
24.Pull the clock trim piece in the center. Pull straight up. Two connectors to disconnect.
25.To remove the trim piece that covers the inside of the instrument panel (instrument cluster finish panel), you need to remove two push pins that are on the top. Lower the steering wheel to have enough space (by simply adjusting the steering by moving the steering wheel adjuster lever). To be able to remove them, you need to take a flat head screwdriver and push the center round piece in the clip shown below
then pull the piece straight out (two push pins at the bottom)
To remove combination meter assembly, remove two Philp screws
At the back there are two connectors to disconnect
26.To remove push start, just pull the piece straight out. At the back there will be one connector to disconnect.
27.Now we need to drop the steering column. To do this you need to loosen two 12 mm bolts shown below (the right side one is not shown). Do not remove completely.
Now remove this 12mm bolt (shiny one pretty much in the center of the pic) which attaches steering column to the reinforcement bar. This is hard to remove if you are alone. If you have a helper, ask him/her to sit on the driver side from the passenger side (so that you have enough space to work) and press brake pedal hard. Then you can remove 12mm bolt using a socket and remove it at ease.
Then you can remove the above two 12mm bolts all the way and drop the steering wheel.
Caution: Don’t overextend the steering wheel as it may cause some damage. Just enough to put it on the edge of the seat or better put it on a ft-height stool right under the steering wheel and leave it there. There is still a bunch of wires connected and you can’t drop it all the way to the floor so please check that. I marked the alignment (with power steering shaft assembly) with paint but it wasn’t needed as I never separated them. All you need is the bottom paint mark though even if you do.
28.Remove wiper arms. There are two 14mm bolts to remove. Even though they have markings on them place left one on the left side and right one on the right side so that you know which one goes where.
Last edited by alpha_1976; Oct 27, 2022 at 07:31 AM.
Thread Starter
|
Enthusiast
Joined: Jun 2013
Posts: 28
Part 5:29.To remove cowl top ventilator, remove these two push pin style clips. One on the left and the other on the right. Unscrew it a bit and pull it out using fastener remover tool or just a flat head screwdriver.


Weatherstripping can be detached by pulling the piece away

Under the Hood:
30.Also disconnect low-P and high-P lines from the expansion valve. Remove 10mm bolt and then move the plate out of the way by turning it 90 degrees. Before you pull the two lines out make sure you have completely empty system. Pulling the lines could be a bit tricky. Don’t pull to hard. Wiggle them a bit and then come back later. Once disconnected, cover the two lines with tape so that no debris and moisture can enter.

31.To remove coolant lines, you will need to make some space. For that I’d suggest removing intake hose. Remove the spring type clamp pretty much in the center of the pic as well as one on the right of it. This i believe is a 10mm bolt just loosen it and it will loosen the hose and you can remove it.


disconnect the connector

Right under the connector there is another small hose, remove that as well. After this you can remove the big hose on the top as well as bottom and move it out of the way. You still can’t take the whole thing out altogether and you don’t need to do that.
I used hose remover pliers and they came out easy. Without them they may give you a bit of hard time. I marked the upper one (heater outlet) as U but it is not needed.
Caution: A little bit of coolant will come out.

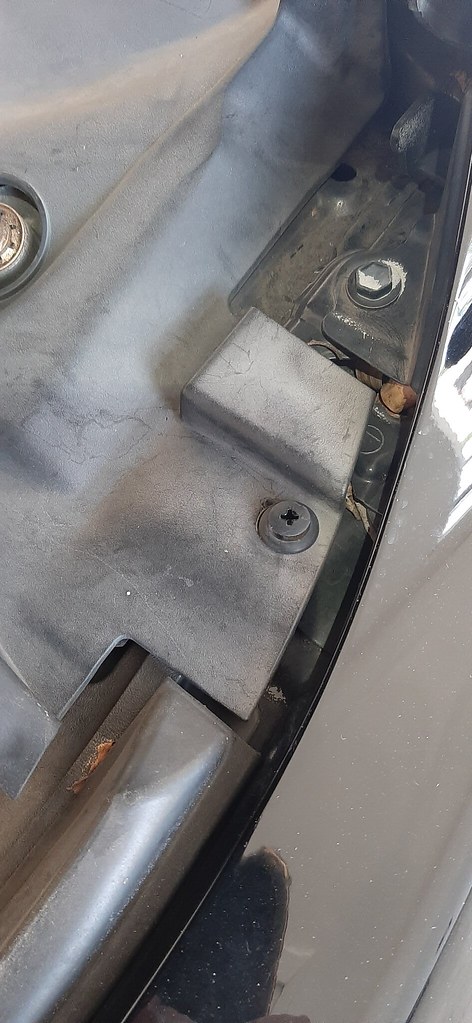
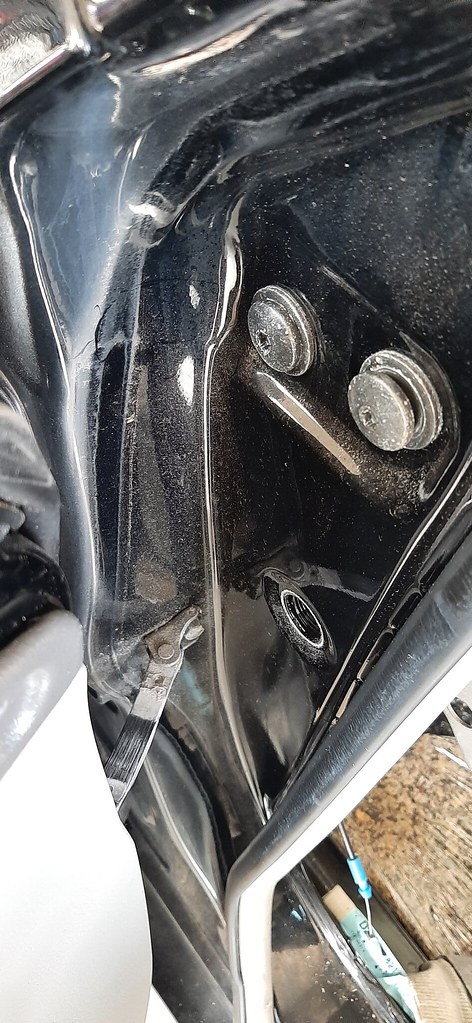
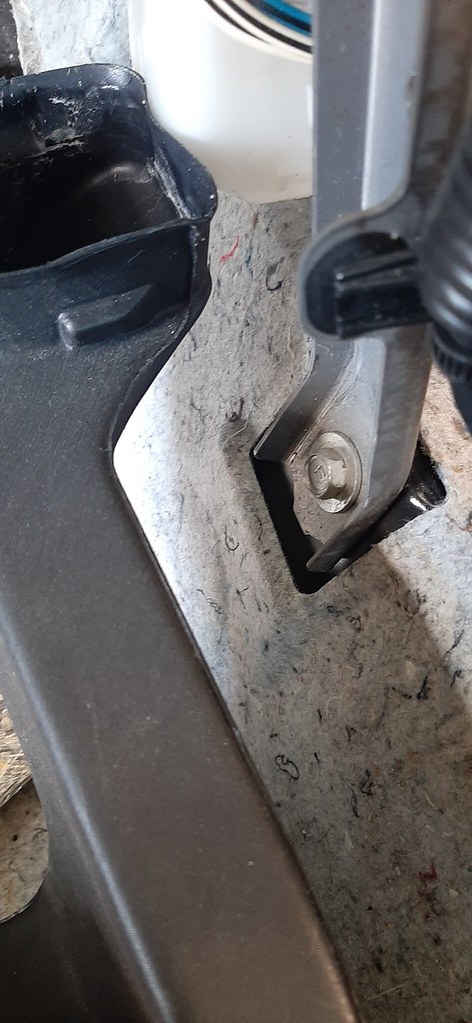
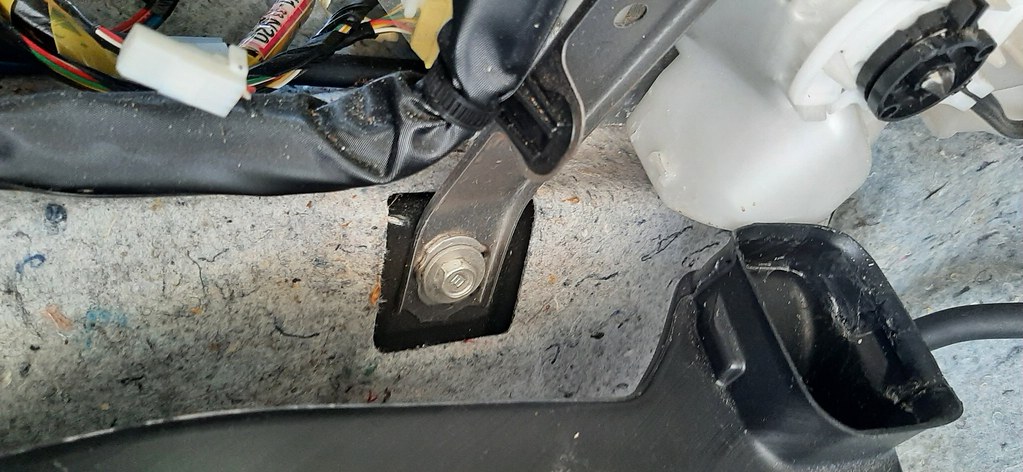
32.You will also need to remove two bolts that attach reinforcement bar to the firewall. If you are standing in front and looking right under the cowl top ventilator (which you removed in step 29) you will see four rubber plugs. The left side (passenger side) one is easy to spot as it is the only one there – remove it and remove the 10mm bolt. On the right (driver side) you will see three. Remove the rubber plug for the right side (left and middle are dummy). Remove these two 10mm bolts under.


Back in the Car:
33.There are a bunch of 10mm bolts and screws that keep the pads attached to the reinforcement bar. Remove them.


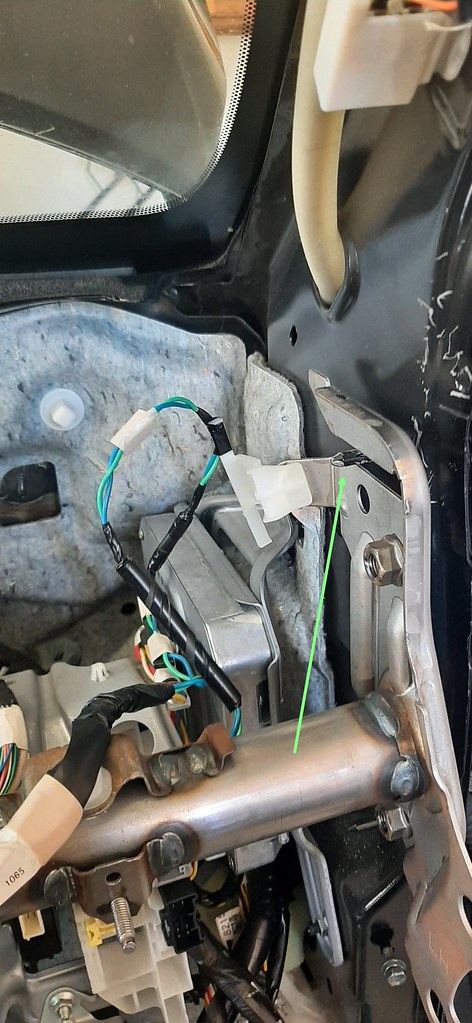
34.Reinforcement bar has two metal clips that go into the AC assembly from the top and secured by two 10mm bolts. Remove them.

35.Look under the dash pad you will see this- remove the white connector

36.On the Driver’s side and passenger’s side you will need to remove the trim piece (pillar garnish) that contains curtain style airbags. To remove the piece, pull out on the top, then you will need to disengage this type of clip by twisting it. Clip is hard to see but it is on the top and is black colored. Use a flat screwdriver and push it enough to twist it so that it can come out of the slot.


Weatherstripping can be detached by pulling the piece away
Under the Hood:
30.Also disconnect low-P and high-P lines from the expansion valve. Remove 10mm bolt and then move the plate out of the way by turning it 90 degrees. Before you pull the two lines out make sure you have completely empty system. Pulling the lines could be a bit tricky. Don’t pull to hard. Wiggle them a bit and then come back later. Once disconnected, cover the two lines with tape so that no debris and moisture can enter.
31.To remove coolant lines, you will need to make some space. For that I’d suggest removing intake hose. Remove the spring type clamp pretty much in the center of the pic as well as one on the right of it. This i believe is a 10mm bolt just loosen it and it will loosen the hose and you can remove it.
disconnect the connector
Right under the connector there is another small hose, remove that as well. After this you can remove the big hose on the top as well as bottom and move it out of the way. You still can’t take the whole thing out altogether and you don’t need to do that.
I used hose remover pliers and they came out easy. Without them they may give you a bit of hard time. I marked the upper one (heater outlet) as U but it is not needed.
Caution: A little bit of coolant will come out.
32.You will also need to remove two bolts that attach reinforcement bar to the firewall. If you are standing in front and looking right under the cowl top ventilator (which you removed in step 29) you will see four rubber plugs. The left side (passenger side) one is easy to spot as it is the only one there – remove it and remove the 10mm bolt. On the right (driver side) you will see three. Remove the rubber plug for the right side (left and middle are dummy). Remove these two 10mm bolts under.
Back in the Car:
33.There are a bunch of 10mm bolts and screws that keep the pads attached to the reinforcement bar. Remove them.
34.Reinforcement bar has two metal clips that go into the AC assembly from the top and secured by two 10mm bolts. Remove them.
35.Look under the dash pad you will see this- remove the white connector
36.On the Driver’s side and passenger’s side you will need to remove the trim piece (pillar garnish) that contains curtain style airbags. To remove the piece, pull out on the top, then you will need to disengage this type of clip by twisting it. Clip is hard to see but it is on the top and is black colored. Use a flat screwdriver and push it enough to twist it so that it can come out of the slot.
Last edited by alpha_1976; Oct 27, 2022 at 07:33 AM.
Thread Starter
|
Enthusiast
Joined: Jun 2013
Posts: 28
Part 6:37.Disconnect the airbag connector on the passenger side. Now trick to disengage this is that you will have to take a flat head screwdriver and pull the yellow tab. This tab is like a spring it’ll go back as soon as you release it.


you can also see two 10mm bolts that you will need to remove as this goes with dash pad

38.Also remove three 10 mm ground wires bolts (picture below shows two, remaining is on the driver side)

39.Also look under the dash pad you will see a bunch of clips that you will need to disengage before pulling the dash pad

Pulling the dash pad:
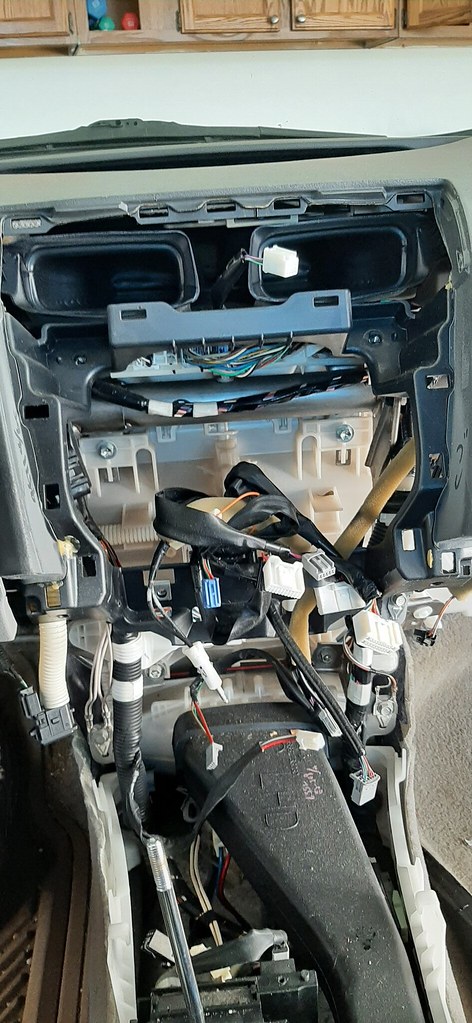
40.Now check under the dash again and start pulling the dash slowly towards you. In front there are 3 or 4 clips (see in pics below on the top and in the last pic) and dash is simply pushed in so all you have to do is pull it away gently. If you see it moves a little but stops look under the dash again and check if you have removed all the nuts and bolts as well as have disconnected connectors and harnesses. After a few trials dash pad is going to come free. Put it away.


41.You can also see reinforcement bar is hanging on two support pins as well as screwed in. Remove these bolts using a T40. I used this (a � in drive ratchet with � in socket and T40 bit fits in perfectly). On the driver side you will have 3 “TORX” bolts but on the passenger side you will have two bolts as well as what they call adjusters or collars. First remove bolts all the way (they have space in between so they will come loose and then you will have to use wrench again). After that you will see adjuster/collar just remove them using 12mm hex bit. They will not be tight.

Removal of AC unit:
42.Remove the ac drain

43.Remove two 10mm bolts after disconnecting floor air ducts (easy to remove simply pull them down and move aside 2nd pic below)
44.Remove these two 10mm screws (not bolts) that attach the AC unit to the metal bar


you can also see two 10mm bolts that you will need to remove as this goes with dash pad
38.Also remove three 10 mm ground wires bolts (picture below shows two, remaining is on the driver side)
39.Also look under the dash pad you will see a bunch of clips that you will need to disengage before pulling the dash pad
Pulling the dash pad:
40.Now check under the dash again and start pulling the dash slowly towards you. In front there are 3 or 4 clips (see in pics below on the top and in the last pic) and dash is simply pushed in so all you have to do is pull it away gently. If you see it moves a little but stops look under the dash again and check if you have removed all the nuts and bolts as well as have disconnected connectors and harnesses. After a few trials dash pad is going to come free. Put it away.
41.You can also see reinforcement bar is hanging on two support pins as well as screwed in. Remove these bolts using a T40. I used this (a � in drive ratchet with � in socket and T40 bit fits in perfectly). On the driver side you will have 3 “TORX” bolts but on the passenger side you will have two bolts as well as what they call adjusters or collars. First remove bolts all the way (they have space in between so they will come loose and then you will have to use wrench again). After that you will see adjuster/collar just remove them using 12mm hex bit. They will not be tight.
Removal of AC unit:
42.Remove the ac drain
43.Remove two 10mm bolts after disconnecting floor air ducts (easy to remove simply pull them down and move aside 2nd pic below)
44.Remove these two 10mm screws (not bolts) that attach the AC unit to the metal bar
Last edited by alpha_1976; Oct 27, 2022 at 07:35 AM.
Thread Starter
|
Enthusiast
Joined: Jun 2013
Posts: 28
Part 7:45.Remove these two 12mm bolts (DO NOT remove the black one)


46.Remove 10mm nuts and bolts


Also remove a nut with built-in-washer on the passenger side under the blower motor where passenger will have feet.

47.You will also need to disconnect a bunch of electrical connectors on drivers and passenger’s side
For the black ones (top pic) trick is to pull the black piece out by pulling from the right.


48.Remove passenger side vent
The trick is to disengage a clip that is on the top of the air duct. Use a flathead screwdriver and lift the piece up that is blocking the access and then use another screw driver and lift the tab up. When you do, twist the air duct towards you and it will come off. It’ll make a big noise like something broke. Do the same for the other one that is on the drivers side.


49.At this point you should be able to pull the reinforcement bar at least a bit
50.Disconnect the blower connector

51.Remove 10mm bolts one on left and the other one on right

52.Now remember this pic here

You can see how the metal clips on reinforcement bar come from the top so to be able to free the AC unit, you need to lift the reinforcement bar enough so that you can slide the AC unit out. When you try to lift the reinforcement bar, you will see AC unit will lift with it even if nothing else is connected. Push the AC unit down while you lift the reinforcement bar up and it will be released. It took me hours as I thought something was still connected or bunch of wires still getting caught somehow.
53.It was easier for me to remove AC unit by separating it from the blower unit. To do this you need to remove two 10mm screws one at the bottom and nearly at the top. This is not too hard; trick is to pull the reinforcement bar a bit forward so that you have some space at the back then use a mirror to locate the top 10mm screw (it’s black just like the bottom one). Close to 10mm bolt on the top there is a plastic clip/claw as well – disengage that. Bottom 10mm screw is visible in pics and very easy.


46.Remove 10mm nuts and bolts
Also remove a nut with built-in-washer on the passenger side under the blower motor where passenger will have feet.
47.You will also need to disconnect a bunch of electrical connectors on drivers and passenger’s side
For the black ones (top pic) trick is to pull the black piece out by pulling from the right.
48.Remove passenger side vent
The trick is to disengage a clip that is on the top of the air duct. Use a flathead screwdriver and lift the piece up that is blocking the access and then use another screw driver and lift the tab up. When you do, twist the air duct towards you and it will come off. It’ll make a big noise like something broke. Do the same for the other one that is on the drivers side.
49.At this point you should be able to pull the reinforcement bar at least a bit
50.Disconnect the blower connector
51.Remove 10mm bolts one on left and the other one on right
52.Now remember this pic here
You can see how the metal clips on reinforcement bar come from the top so to be able to free the AC unit, you need to lift the reinforcement bar enough so that you can slide the AC unit out. When you try to lift the reinforcement bar, you will see AC unit will lift with it even if nothing else is connected. Push the AC unit down while you lift the reinforcement bar up and it will be released. It took me hours as I thought something was still connected or bunch of wires still getting caught somehow.
53.It was easier for me to remove AC unit by separating it from the blower unit. To do this you need to remove two 10mm screws one at the bottom and nearly at the top. This is not too hard; trick is to pull the reinforcement bar a bit forward so that you have some space at the back then use a mirror to locate the top 10mm screw (it’s black just like the bottom one). Close to 10mm bolt on the top there is a plastic clip/claw as well – disengage that. Bottom 10mm screw is visible in pics and very easy.
Last edited by alpha_1976; Oct 27, 2022 at 07:37 AM.
Thread Starter
|
Enthusiast
Joined: Jun 2013
Posts: 28
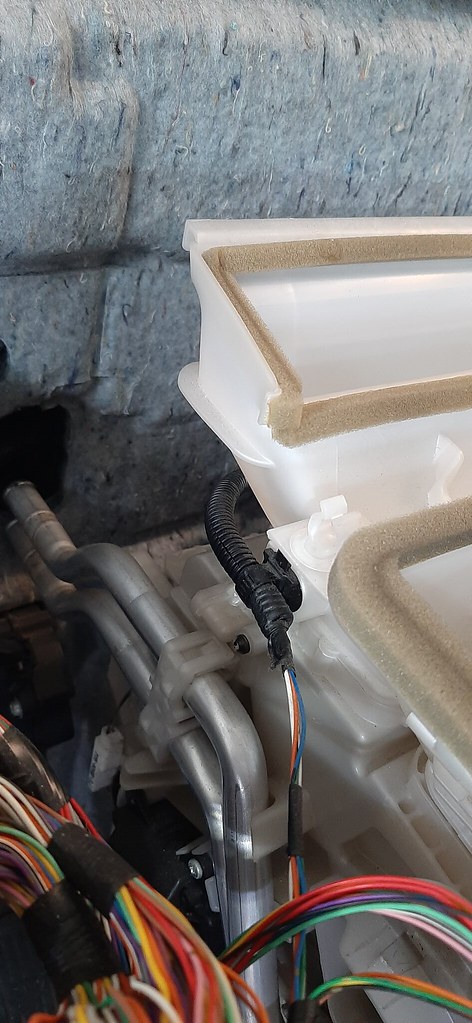
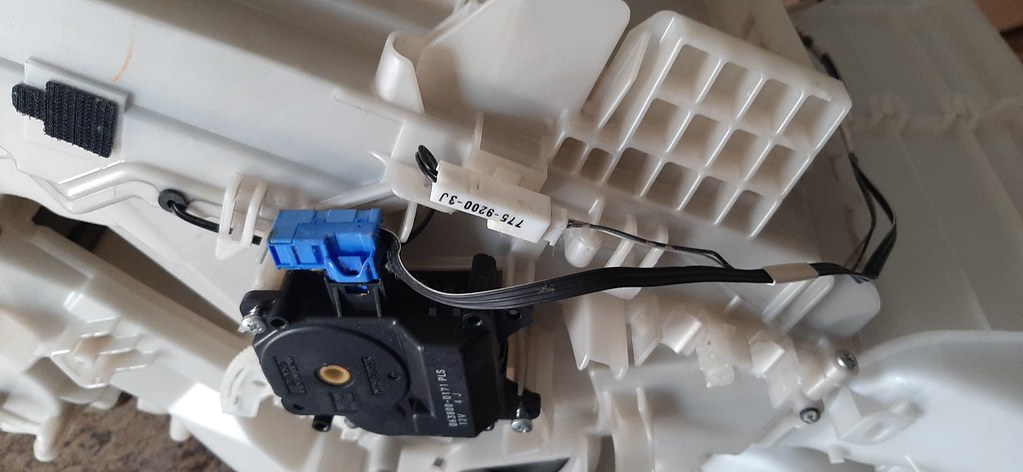
Part 8:54.Before separating also disconnect the connector that is on the top of the blower assembly (air inlet control servo). It’s the part of the same harness shown below. You can’t miss it. It’s black and blue. (if you are pulling together then no need to disconnect)
55.For hybrid – you will need to disconnect PTC connector – heater shown in the top pic and bottom one shows location of connector (right under the air duct for the back)


56.Also remove this connector piece which is located at the back of AC unit. The whole connector will come. To do this pull/tilt the AC unit forward. Then remove the clip that holds the harness to the AC unit (connector stays in the car).
57.Also remove this from the front of the AC

58.Disconnect all the connectors as well as release the bunch of wires from the clip at the bottom. You will need all the flexibility you can get.

Pull the AC unit out:
59.To do this it’s better if you find a helper. Send the helper to the driver side as that part of the reinforcement bar does not need to be pulled out too much. The passenger side needs to be pulled far enough so that you have space for bulky AC unit to be pulled out. You can remove the blower assembly very easily, but the center will still need some effort as you adjust connectors and what not while you pull from the top. Also metal arm that connects the reinforcement bar to the firewall will be in the way.
Caution: Make sure you don’t bump coolant lines into your windshield and break it as they will be on the top when you pull the AC.
60.Once the unit is out, it was very straightforward to remove all three components i.e. evaporator core, heater core and the PTC heater for inspection. To remove heater core, remove plastic piece securing coolant lines and a few Phillips screw


61.you will also need to remove this motor (2 Phillips screws) and then you can pull the heater core out.
Caution: Heater core will have coolant and may spill.
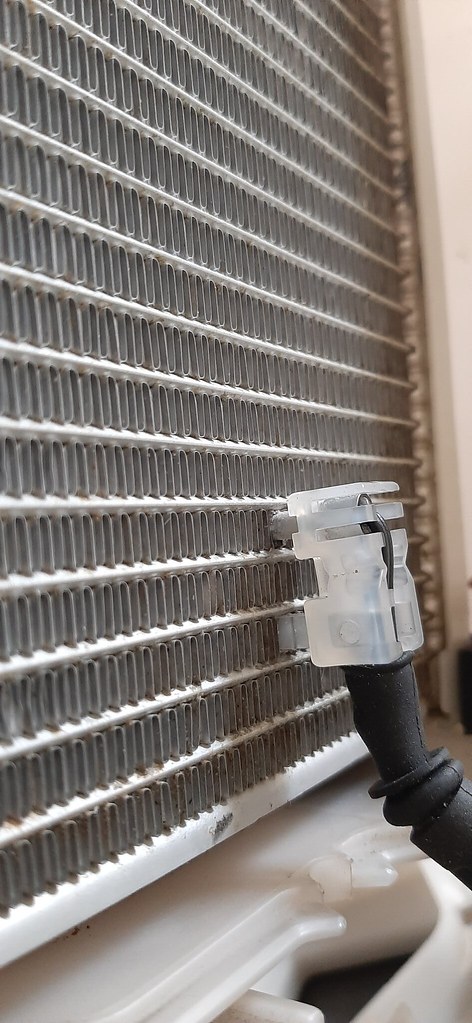
62.To remove evaporator core, you will need to remove six Phillips screws and release the 4 claws then just remove the plate cover. When you remove evaporator core you will need to remove cooler thermistor by pulling it (notice the location as you will need to install it on new evaporator core)

63.Also remove the expansion valve by removing two bolts (4mm hexagon). In my case, it was hard to separate expansion valve from the metal fittings even though there were just O-rings there. As I had to change everything (evaporator as well as expansion valve) I used a plier to force it out.

64.If you want to clean the air ducts, all you need to do is remove bunch of Phillips screws and release some claws and separate it in two parts after removing the top air duct shown in first pic


Installation:
Installation will be in reverse and relatively easy. A few things to keep in mind:
This is behind the instrument cluster and probably easy to forget.
7. Curtain style airbag trim piece (pillar garnish) – The top clip that you remove in step 36. The trick to put this trim piece back is that you grab a plier and twist it and leave it that way for maybe 10 seconds. When you release it, it’ll stay parallel to the slot for a few minutes. Insert it in the slot and you are done. The Manual says to cut it but you can reuse it this way.
10. The DENSO evaporator will come with foam pads attached on one end but not the other. I used a putty knife and was able to remove pieces from the old evaporator core which had pieces on both ends and transferred them to the new one. These are probably required otherwise evaporator may not sit tightly.
Good luck!
55.For hybrid – you will need to disconnect PTC connector – heater shown in the top pic and bottom one shows location of connector (right under the air duct for the back)
56.Also remove this connector piece which is located at the back of AC unit. The whole connector will come. To do this pull/tilt the AC unit forward. Then remove the clip that holds the harness to the AC unit (connector stays in the car).
57.Also remove this from the front of the AC
58.Disconnect all the connectors as well as release the bunch of wires from the clip at the bottom. You will need all the flexibility you can get.
Pull the AC unit out:
59.To do this it’s better if you find a helper. Send the helper to the driver side as that part of the reinforcement bar does not need to be pulled out too much. The passenger side needs to be pulled far enough so that you have space for bulky AC unit to be pulled out. You can remove the blower assembly very easily, but the center will still need some effort as you adjust connectors and what not while you pull from the top. Also metal arm that connects the reinforcement bar to the firewall will be in the way.
Caution: Make sure you don’t bump coolant lines into your windshield and break it as they will be on the top when you pull the AC.
60.Once the unit is out, it was very straightforward to remove all three components i.e. evaporator core, heater core and the PTC heater for inspection. To remove heater core, remove plastic piece securing coolant lines and a few Phillips screw
61.you will also need to remove this motor (2 Phillips screws) and then you can pull the heater core out.
Caution: Heater core will have coolant and may spill.
62.To remove evaporator core, you will need to remove six Phillips screws and release the 4 claws then just remove the plate cover. When you remove evaporator core you will need to remove cooler thermistor by pulling it (notice the location as you will need to install it on new evaporator core)
63.Also remove the expansion valve by removing two bolts (4mm hexagon). In my case, it was hard to separate expansion valve from the metal fittings even though there were just O-rings there. As I had to change everything (evaporator as well as expansion valve) I used a plier to force it out.
64.If you want to clean the air ducts, all you need to do is remove bunch of Phillips screws and release some claws and separate it in two parts after removing the top air duct shown in first pic
Installation:
Installation will be in reverse and relatively easy. A few things to keep in mind:
- Don’t forget to connect the connector in step 56. This goes at the back of the HAVC unit and is pretty much the first thing you should do when the AC unit is in.
- When you install the expansion valve and install low and high-P lines make sure you use plenty of ND-11 oil (for hybrid) (or suitable PAG oil for the non-hybrid) on the O-rings.
- When you have AC and blower unit back in place make sure all three connectors are connected two of which are shown in step 54. You have to disconnect the 3rd one (for Air inlet control/not shown) if you separate the blower assembly. The Air inlet motor is installed on the top of the blower assembly but the harness remains with the AC unit so you might forget to connect it back – Ask me how I know! I had to pull the dash again as there is no way you can connect the connector without having access from the top.
- After I put the AC unit back in place and secured (but no dash or any other connections), I hooked a yellow jacket vacuum pump and evacuated the system. I was able to pull the vacuum down to 180 micros. Then I closed a valve close to the pump and isolated the system and left it overnight. The next morning vacuum was still at 270 microns. This was my way of checking that the new evaporator core was not faulty.
- Make sure you double check yellow connectors for the airbag on the driver side (knee airbag step 19) and the one under the dash (step 37) are connected.
- Make sure you reconnect this connector
This is behind the instrument cluster and probably easy to forget.
7. Curtain style airbag trim piece (pillar garnish) – The top clip that you remove in step 36. The trick to put this trim piece back is that you grab a plier and twist it and leave it that way for maybe 10 seconds. When you release it, it’ll stay parallel to the slot for a few minutes. Insert it in the slot and you are done. The Manual says to cut it but you can reuse it this way.
- Don’t forget to reconnect coolant hoses (and intake hoses). Coolant loss will be minimal, but I still advise you to burp the system by removing the pressure cap and running the car with temp set to HIGH for about 10 minutes and add coolant as system burps.
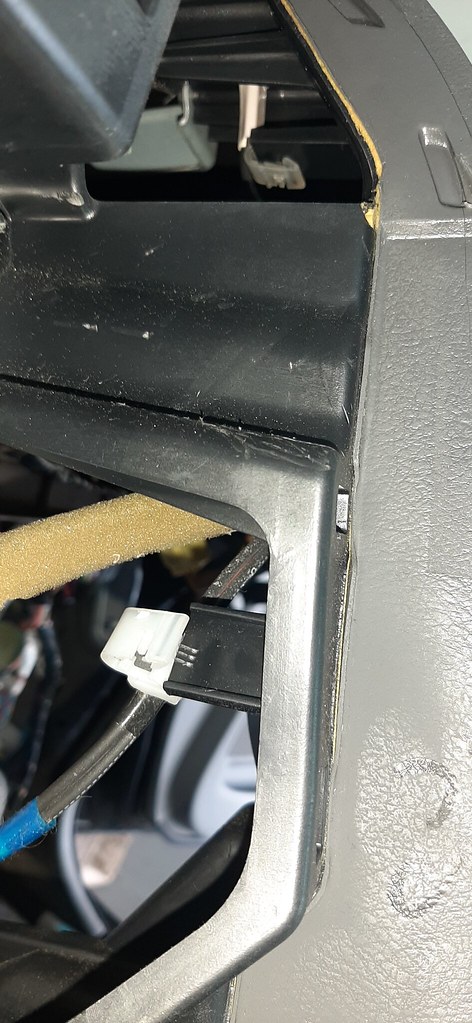
- The two connectors that you remove in step 24. When you slide the dash pad back, they have a tendency to get caught between the top air ducts on the AC unit and the dash pad just like you see in the pic below. Look through all air ducts/registers and make sure they are touching the dash pad cleanly and there is no wire harness or anything in there.
10. The DENSO evaporator will come with foam pads attached on one end but not the other. I used a putty knife and was able to remove pieces from the old evaporator core which had pieces on both ends and transferred them to the new one. These are probably required otherwise evaporator may not sit tightly.
Good luck!
Last edited by alpha_1976; Oct 27, 2022 at 07:38 AM.

Thread
Topic Starter
Forum
Replies
Last Post
PriusPurveyor
Toyota Camry Hybrid
7
Aug 24, 2020 08:29 PM


