Remote trunk release; how to install in Canadian HCH II?


Thread Starter
|
Active Enthusiast
Joined: Nov 2009
Posts: 210
Bengteck, I forwarded that photo of your home built "additional module" that requires 2 triggers before it will pass power to an aftermarket solenoid to a buddy of mine. Since I am not an experienced electrical hobbyist, I have no idea on how to build something like that.......
Could you post that same picture in this venue and perhaps someone in the crowd can provide insight on how to build it or where to purchase a facsimile of same?
For the rest of the folks who do not have a power trunk release that works with the key fob button that came with the car:
The only hold-up is to find a way that a "device" will sense a 12 volt pulse, remember it and then if a 2nd 12 volt pulse occurs within 2 seconds, the 2nd 12 volt pulse is allowed to pass thru to an aftermarket trunk release solenoid.
My vision to do this project is as follows (with info from 2006-2007 Electrical Troubleshooting HCH manual):
The keyless entry system and alarm system are controlled by one box (sorry I do not know how to do the adobe thing, these are simply photos):
Attachment 1275
The above photo depicts the brains of the Power Door Locks/Keyless Entry/Security System. It is located in the Under-dash Fuse/Relay Box.
Attachment 1276
The above photo depicts a close up of what is called the MICU (Multiplex Integrated Control Unit). Note the 3 horizontal lines, each with an arrowhead at the right end. Arrowhead A (door lock command) is the MICU signal path to lock the doors. Arrowhead B (door unlock command) is the MICU signal path to unlock the doors. Arrowhead C (trunk release command), inside the dashed box, is the USA only MICU signal path to the USA only Trunk Lid Opener Solenoid.
Attachment 1277
The above photo shows where Arrowhead A, the door lock command, and Arrowhead B, the door unlock command, go to. The 4 door lock motors are in the center. They all receive a 12V "+" pulse via an (individual to each motor) blue wire to "lock". They all receive a 12V "+" pulse via an (individual to each motor) yellow wire to "unlock".
Attachment 1278
The above photo shows where Arrowhead B, the door unlock command, actuates the relay to unlock the drivers door (first pulse from factory supplied remote key fob) and then the 2nd relay to unlock the 3 remaining doors (second pulse from factory supplied remote key fob).
Attachment 1279
The above photo shows the details of where the rear drivers side door lock motor gets its unlock signal. The wire is yellow in color. The connector "C771" between the MICU and the Left Rear Door Lock Actuator is where I plan to tap into the existing system to power the aftermarket trunk solenoid.
Since I can only uplift 5 photos at a time, I'm going to submit this reply and then continue with more details in a moment...stay tuned.
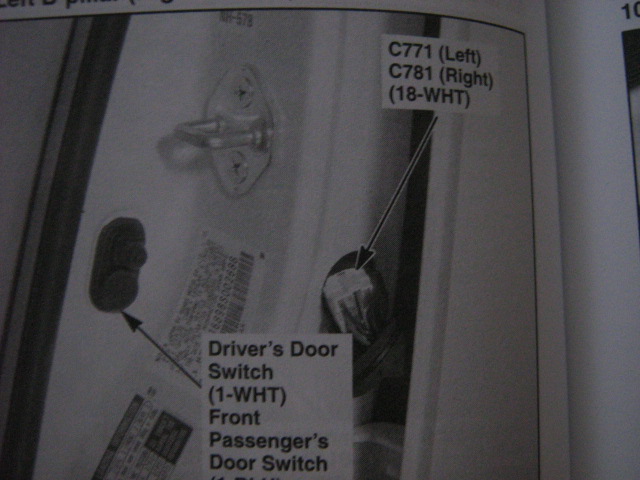
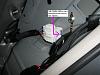
The above photo shows connector C771. It is in the Left B-pillar. The rubber boot that seals the wire bundle (from the left b-pillar to the left rear door) at the left b-pillar is simply friction fit and can be temporarily removed so as to expose connector C771.

The above photo shows the details of connector C771. The 12 volt "+" signal to unlock this (and the other 2) doors flows thu pin #6...
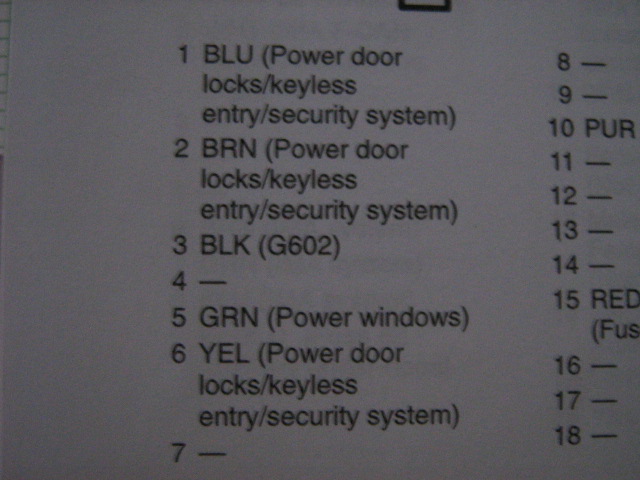
The above photo shows that pin number 6 of connector 771 has the yellow wire that is part of the "power door lock/keyless entry/security system".
To test my concept, I employed a 12 volt test lamp. With the test lamp probe inside the pin 6 cavity and the other end grounded to the door latch (as seen in the 1st photo, above), I pressed the unlock button on my key fob once. The drivers door unlocked and no test lamp signal. I pressed the unlock button on the key fob a second time and the test lamp glowed momentarily while the 12 volt "+" signal did its job and unlocked the 3 remaining doors.
I then held down the Drivers door switch (as seen in the 1st photo, above) to simulate that all 4 doors were closed and that the lock button on the key fob would actually lock the system. I pressed the lock button on the key fob. All 4 doors locked and no test lamp signal.
Therefor, I know that I have a 12 volt "+" signal that only pulses after pressing the unlock button on the key fob twice.
I can tap into the yellow wire at pin 6 of connector 771 and feed said wire to the back latch were a simple after market trunk solenoid can be grounded and employed to remotely open the trunk.
Advantages: security system is turned off with the first press of the key fob unlock button, so no nuisance alarms. Also, the trunk opens remotely via the factory key fob unlock button being pushed a 2nd time.
Drawback: any time I open the 3 remaining doors, the trunk also opens.
So, bottom line, this is how I plan to (electrically) employ a remote trunk release. If I can find a "device" that will mount in series between my tap (at connector 771) and my aftermarket solenoid that requires 2 pulses (thus a 3rd tap on the key fob unlock button) to actuate the solenoid, I can eliminate the above stated drawback.
Comments most welcome.
Thanks
mike

Active Enthusiast
Joined: Jan 2008
Posts: 92
So, bottom line, this is how I plan to (electrically) employ a remote trunk release. If I can find a "device" that will mount in series between my tap (at connector 771) and my aftermarket solenoid that requires 2 pulses (thus a 3rd tap on the key fob unlock button) to actuate the solenoid, I can eliminate the above stated drawback.
How about using Autoswitch to pickup the 2 pluses...
http://www.autoswitch.com/2006/model...p2_index.shtml
and using pop truck from Autoloc
http://www.thehoffmangroup.com/autol...nc=powertrunks
How about using Autoswitch to pickup the 2 pluses...
http://www.autoswitch.com/2006/model...p2_index.shtml
and using pop truck from Autoloc
http://www.thehoffmangroup.com/autol...nc=powertrunks
Thread Starter
|
Active Enthusiast
Joined: Nov 2009
Posts: 210
starman:
Much thanks for the links.
Wow, the first one does sound very promising, but deep in the instructions I found this.....
The above step would be accomplished by the 2nd and 3rd tap of my unlock button....
...and this step would actuate the trunk solenoid, but...
Thus, with this product, the power to the trunk opening solenoid would not be a single pulse (of about 1/2 a second) but would stay on continuously until I hit the key fob button twice....I have e-mailed their tech support to see if it can be modified to automatically stop sending voltage after about 1/2 a second.
Thanks
Mike
Much thanks for the links.
Wow, the first one does sound very promising, but deep in the instructions I found this.....
2. Touch the yellow wire to the +12V power source, twice quickly. Two quick contacts in under 1.2 second makes this work.
3. The violet wire is now energized and the LED is lighted green. Check for voltage at the end of the violet wire. It would be approximately 1.5 to 2.0 volts less than your input voltage on the red wire. (reverse voltage protection reduces voltage level)
4. Repeat step 2 to de-energize the violet wire, or simple pull the power off the red wire.
Thanks
Mike
Active Enthusiast
Joined: Jul 2007
Posts: 87
From: Singapore
If I read your posting correctly, you stress that you're not electrically/electronically inclined but like to assume lots of things before you confirm them. On paper it defers greatly if hands-on so vehicle modification not for the faint hearted.
The answers given by fellow forumer, so the next step you need to spend some money to test them out before decide its fate on paper.
Like you mentioned, the yellow supply wire from connector E pin 14 (also pin 6 at the door connector) the source of the door opening trigger but without the additional device to convert the two inputs into one output you'll be closing the boot so often that surely frustrate your modification interest. Take my word we're there before.
Btw the device trigger timing cannot be changed unless you willing to spend a bomb ask them modify for you. (The controller chip need a expensive programmer to change them)
Thread Starter
|
Active Enthusiast
Joined: Nov 2009
Posts: 210
The following is a detailed explanation of the technique I have decided to employ. The heart of making this technique function is a "delay relay" called the DEI 528...
http://www.crutchfield.com/S-ZgD5KHz...ay-Module.html
I purchased same from E-bay for a delivered to my home in Canada price of $CDN 20.33.
I will be purchasing, in January, the Honda OEM trunk lid solenoid part number 74851-SNA-A22 in Michigan over the counter for $US 42.00.
I will do system concept testing prior to the actual Honda OEM trunk lid solenoid part number 74851-SNA-A22 being in place, so a detailed explanation of how everything went will be promulgated here in mid January.
My technique will now be explained.
To fire the trunk solenoid in a controlled fashion using the OEM remote on the key, I will be using a total of 3 relays, one being the DEI 528T.
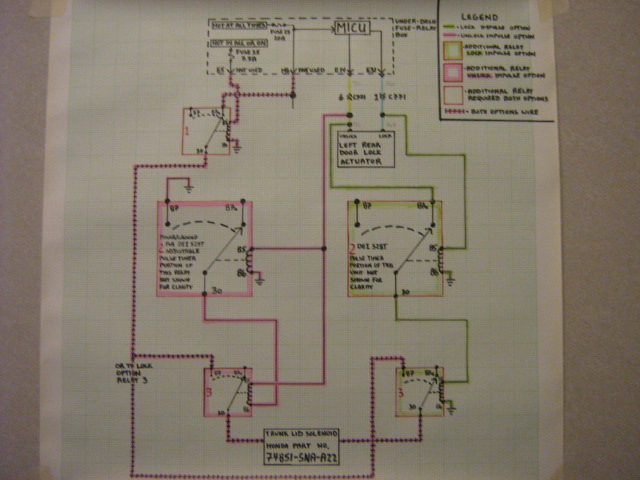
Below is a photo of my system overview. One will notice pink tinged relays that depict an "unlock pulse option". One will notice green tinged relays that depict a "lock pulse option". In either option, only a total of 3 relays will be used. First, a quick look at the big picture....
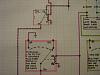
I will deal with relay number 1, as depicted in detail in the left portion of the photo below...

Relay number 1 is employed such that the Honda OEM trunk lid solenoid will NOT have power to fire if the key is in "ACC or ON". My HCH II has automatically locking/unlocking doors that will lock when I put the car in gear and unlock when I put the car in park. I do not want the trunk to "pop" under these circumstances.
Note that relay 1 shows battery power flowing to terminal 87a and thru to terminal 30 when the coil (of relay 1) is not powered. This is when the car is not on and one wants power to be available at relay 3 (detailed after next photo, below). When the key is in "ACC or ON", the coil in relay 1 is enabled and throws the internal switch (of relay 1) to terminal 87. The flow to terminal 30 is stopped.
To review, relay 1 only lets power flow thru to relay 3 if the key IS NOT in "ACC or ON".
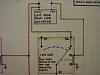
I will pass over relay 2/DEI 528T for a moment and discuss relay 3. Please note relay 3 as depicted in the photo below...
In either the "lock pulse" option or the "unlock pulse" option, relay 3 is employed in the same manner, but its coil is connected in a different manner. In both options, terminal 87 is attached to the output of relay 1. Terminal 30 is connected to the Honda OEM trunk lid solenoid. The only way that the Honda OEM trunk lid solenoid will be powered is if the coil in relay 3 is powered and throws the internal switch (of relay 3) to terminal 87. The only way that the coil in relay 3 will be energized is when a proper pulse is received from the relay 2/DEI 528T output (discussed in detail after next photo). If the "unlock pulse" option is used, terminal 85 (of relay 3) is attached to the OEM yellow wire that feeds the "left rear door lock actuator" and terminal 86 (of relay 3) is attached to terminal 30 (of relay 2/DEI 528T). If the "lock pulse" option is used, terminal 85 (of relay 3) is attached to terminal 30 (of relay 2/DEI 528T) and terminal 86 (of relay 3) as attached to ground.
To review, relay 3 will only fire the Honda OEM trunk lid solenoid if power is applied to the coil in relay 3 via a controlled input from relay 2/DEI 528T.
I will now discuss relay number 2, the DEI 528T. In all these photos, non of the wires that have to power the portion of the DEI 528T module that deals with the built in circuits for the timer are shown or discussed. I shall only deal with how the relay portion of the DEI 528T is employed.
Below is the photo that details the employment of the DEI 528T using an input impulse from the "unlock impulse" of the "left rear door lock actuator".
In this option, one will use the key fob unlock button as follows: push unlock once to unlock the driver door; push unlock a second time to unlock the 3 remaining doors; and push unlock a third time within 1 second to pop the trunk....
The number 2 relay/DEI 528T terminal 30 is connected to relay 3 coil terminal 86. Terminal 87 (of the DEI 528T) is connected to ground. Terminal 85 of the coil (of the DEI 528T) is connected to the OEM yellow unlock wire for the "left rear door lock actuator". Terminal 86 of the coil (of the DEI 528T) is connected to ground. When its coil is activated, the DEI 528T will throw its internal switch to connect terminal 30 to 87 and keep it thrown for (an adjustable) second or 2. In this scenario, the relay 3 terminal 85 is also connected to the OEM yellow unlock wire for the "left rear door lock actuator".
The dealer explained to me the following:
...even though the unlock pulse (that will open the 3 car doors with the second push of the remote key fob "unlock door" button) goes to the coil on the DEI 528T and to the relay 3 pin 85 (one end of the relay 3 coil) at the same time...
...the delay caused by that same pulse having to fire the coil in the DEI 528T to create a ground for the coil in relay 3 to throw its internal connection to terminal 87 to power the solenoid before the solenoid will fire (whew)...
...will be long enough for one to have to push the "unlock door" button on the remote key fob "again" before the trunk solenoid will fire (via the temporarily provided ground through the DEI 528T.
Since I am not an electronic expert, I have presonal doubts that the delay mentioned above is long enough to prevent the trunk from popping the first time the unlock impulse occures, so...
...my ace in the hole is my second technique....
...where one will push "lock", then "unlock, unlock" to open ONLY all 4 doors without a nusance trunk pop...
...or push "unlock, unlock" if you want to pop the trunk and enter the car.
I will test both techniques once I have all the gear to do so and report on my findings as to which one works best.
Below is the photo that details the employment of the DEI 528T using an input impulse from the "lock impulse" of the "left rear door lock actuator".
In this option, one will use the key fob unlock button as follows: Trunk pop not wanted with drivers only or all 4 doors to be unlocked: push lock once, then push unlock (and unlock a second time for the other 3 doors). Trunk pop wanted: push unlock, unlock.
The number 2 relay/DEI 528T terminal 30 is connected to relay 3 coil terminal 85. Terminal 87 (of the DEI 528T) is blank. Terminal 87a (of the DEI 528T) is connected to the OEM yellow unlock wire for the "left rear door lock actuator". Terminal 85 of the coil (of the DEI 528T) is connected to the OEM green lock wire for the "left rear door lock actuator". Terminal 86 of the coil (of the DEI 528T) is connected to ground. When its coil is activated, the DEI 528T will throw its internal switch to disconnect terminal 30 from 87a and keep it thrown for (an adjustable) second or 2. In this scenario, the relay 3 terminal 85 (coil) is connected to the 2 relay/DEI 528T terminal 30. The relay 3 terminal 86 (coil) is connected to ground.
Once the DEI 528T arrives in the mail, I'll create a temporary setup, using a 12volt test lamp in series with relay 3 to represent the solenoid and determine which option I shall use.
Stay tuned.....
http://www.crutchfield.com/S-ZgD5KHz...ay-Module.html
I purchased same from E-bay for a delivered to my home in Canada price of $CDN 20.33.
I will be purchasing, in January, the Honda OEM trunk lid solenoid part number 74851-SNA-A22 in Michigan over the counter for $US 42.00.
I will do system concept testing prior to the actual Honda OEM trunk lid solenoid part number 74851-SNA-A22 being in place, so a detailed explanation of how everything went will be promulgated here in mid January.
My technique will now be explained.
To fire the trunk solenoid in a controlled fashion using the OEM remote on the key, I will be using a total of 3 relays, one being the DEI 528T.
Below is a photo of my system overview. One will notice pink tinged relays that depict an "unlock pulse option". One will notice green tinged relays that depict a "lock pulse option". In either option, only a total of 3 relays will be used. First, a quick look at the big picture....
I will deal with relay number 1, as depicted in detail in the left portion of the photo below...
Relay number 1 is employed such that the Honda OEM trunk lid solenoid will NOT have power to fire if the key is in "ACC or ON". My HCH II has automatically locking/unlocking doors that will lock when I put the car in gear and unlock when I put the car in park. I do not want the trunk to "pop" under these circumstances.
Note that relay 1 shows battery power flowing to terminal 87a and thru to terminal 30 when the coil (of relay 1) is not powered. This is when the car is not on and one wants power to be available at relay 3 (detailed after next photo, below). When the key is in "ACC or ON", the coil in relay 1 is enabled and throws the internal switch (of relay 1) to terminal 87. The flow to terminal 30 is stopped.
To review, relay 1 only lets power flow thru to relay 3 if the key IS NOT in "ACC or ON".
I will pass over relay 2/DEI 528T for a moment and discuss relay 3. Please note relay 3 as depicted in the photo below...

In either the "lock pulse" option or the "unlock pulse" option, relay 3 is employed in the same manner, but its coil is connected in a different manner. In both options, terminal 87 is attached to the output of relay 1. Terminal 30 is connected to the Honda OEM trunk lid solenoid. The only way that the Honda OEM trunk lid solenoid will be powered is if the coil in relay 3 is powered and throws the internal switch (of relay 3) to terminal 87. The only way that the coil in relay 3 will be energized is when a proper pulse is received from the relay 2/DEI 528T output (discussed in detail after next photo). If the "unlock pulse" option is used, terminal 85 (of relay 3) is attached to the OEM yellow wire that feeds the "left rear door lock actuator" and terminal 86 (of relay 3) is attached to terminal 30 (of relay 2/DEI 528T). If the "lock pulse" option is used, terminal 85 (of relay 3) is attached to terminal 30 (of relay 2/DEI 528T) and terminal 86 (of relay 3) as attached to ground.
To review, relay 3 will only fire the Honda OEM trunk lid solenoid if power is applied to the coil in relay 3 via a controlled input from relay 2/DEI 528T.
I will now discuss relay number 2, the DEI 528T. In all these photos, non of the wires that have to power the portion of the DEI 528T module that deals with the built in circuits for the timer are shown or discussed. I shall only deal with how the relay portion of the DEI 528T is employed.
Below is the photo that details the employment of the DEI 528T using an input impulse from the "unlock impulse" of the "left rear door lock actuator".
In this option, one will use the key fob unlock button as follows: push unlock once to unlock the driver door; push unlock a second time to unlock the 3 remaining doors; and push unlock a third time within 1 second to pop the trunk....

The number 2 relay/DEI 528T terminal 30 is connected to relay 3 coil terminal 86. Terminal 87 (of the DEI 528T) is connected to ground. Terminal 85 of the coil (of the DEI 528T) is connected to the OEM yellow unlock wire for the "left rear door lock actuator". Terminal 86 of the coil (of the DEI 528T) is connected to ground. When its coil is activated, the DEI 528T will throw its internal switch to connect terminal 30 to 87 and keep it thrown for (an adjustable) second or 2. In this scenario, the relay 3 terminal 85 is also connected to the OEM yellow unlock wire for the "left rear door lock actuator".
The dealer explained to me the following:
...even though the unlock pulse (that will open the 3 car doors with the second push of the remote key fob "unlock door" button) goes to the coil on the DEI 528T and to the relay 3 pin 85 (one end of the relay 3 coil) at the same time...
...the delay caused by that same pulse having to fire the coil in the DEI 528T to create a ground for the coil in relay 3 to throw its internal connection to terminal 87 to power the solenoid before the solenoid will fire (whew)...
...will be long enough for one to have to push the "unlock door" button on the remote key fob "again" before the trunk solenoid will fire (via the temporarily provided ground through the DEI 528T.
Since I am not an electronic expert, I have presonal doubts that the delay mentioned above is long enough to prevent the trunk from popping the first time the unlock impulse occures, so...
...my ace in the hole is my second technique....
...where one will push "lock", then "unlock, unlock" to open ONLY all 4 doors without a nusance trunk pop...
...or push "unlock, unlock" if you want to pop the trunk and enter the car.
I will test both techniques once I have all the gear to do so and report on my findings as to which one works best.
Below is the photo that details the employment of the DEI 528T using an input impulse from the "lock impulse" of the "left rear door lock actuator".
In this option, one will use the key fob unlock button as follows: Trunk pop not wanted with drivers only or all 4 doors to be unlocked: push lock once, then push unlock (and unlock a second time for the other 3 doors). Trunk pop wanted: push unlock, unlock.

The number 2 relay/DEI 528T terminal 30 is connected to relay 3 coil terminal 85. Terminal 87 (of the DEI 528T) is blank. Terminal 87a (of the DEI 528T) is connected to the OEM yellow unlock wire for the "left rear door lock actuator". Terminal 85 of the coil (of the DEI 528T) is connected to the OEM green lock wire for the "left rear door lock actuator". Terminal 86 of the coil (of the DEI 528T) is connected to ground. When its coil is activated, the DEI 528T will throw its internal switch to disconnect terminal 30 from 87a and keep it thrown for (an adjustable) second or 2. In this scenario, the relay 3 terminal 85 (coil) is connected to the 2 relay/DEI 528T terminal 30. The relay 3 terminal 86 (coil) is connected to ground.
Once the DEI 528T arrives in the mail, I'll create a temporary setup, using a 12volt test lamp in series with relay 3 to represent the solenoid and determine which option I shall use.
Stay tuned.....
Last edited by navguy12; Nov 27, 2009 at 06:31 AM. Reason: links to first 3 diagrams not functioning
Thread Starter
|
Active Enthusiast
Joined: Nov 2009
Posts: 210
Update: I am going to proceed with the option of having the "lock" pulse disable the power to the trunk solenoid for TBD seconds.
Today, I want to brief how one can tap into the car power supply. My technique will be as follows...
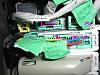
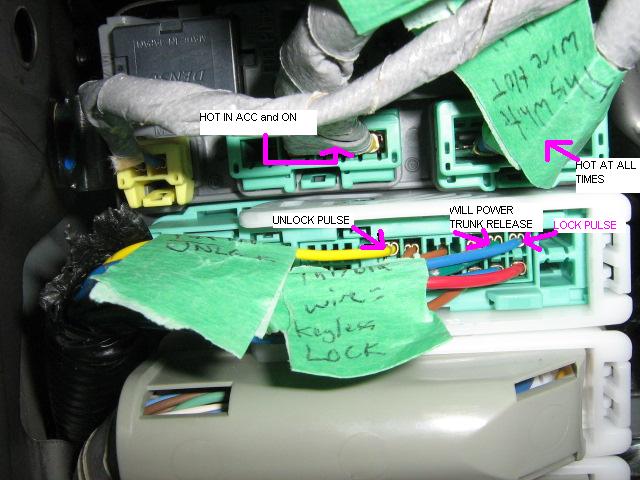
In the above photo, I have removed the lower drivers side instrument panel trim part to expose the under-dash fuse/relay box. I have attached some green tape with ink labels to clarify where one can tap into the existing electrics for this modification.
All taps for this project (except assembly ground) shall occur here.
I have also added some labels and arrows electronically to the photo.
I'll deal with the "Hot at all times" (light green connector D with 2 cavities, the white wire) and "Hot in ACC and ON" (light green connector C with 4 cavities, the red wire) wires at a future date.
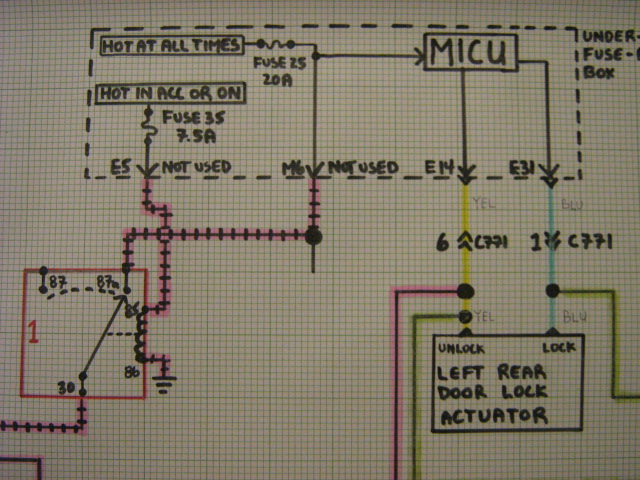
Below, is the detail view from the shop manual of the large 42 cavity light green connector shown above....
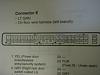
In the top photo, I have tagged the following wires of interest on the light green colored connector "E"....


Cavity 14 is the yellow wire that is the 2nd "unlock" pulse from the keyless entry remote fob. I will eventually tap into this wire to power the coil of the number 3 relay (thru my yet to be constructed assembly) that provides a pulse for the (yet to be purchased) Honda OEM trunk lid solenoid.
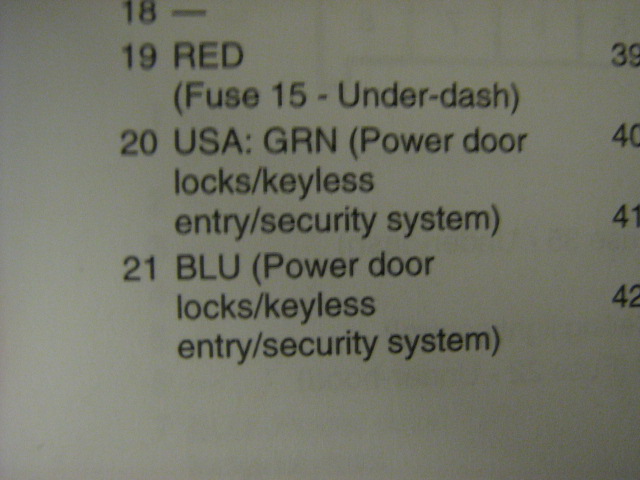
Cavity 21 is the blue wire that carries the "lock" pulse from the keyless entry remote fob. I will eventually tap into this wire to power the coil of the number 2 relay/DEI 528T (thru my yet to be constructed assembly) that PREVENTS a pulse from reaching the (yet to be purchased) Honda OEM trunk lid solenoid.
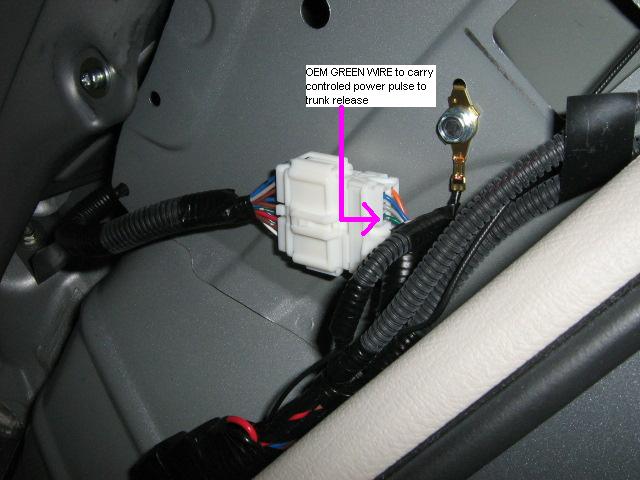
Also note Cavity 20, USA:GRN. This is the wire that would carry a pulse to the trunk solenoid from the MICU in an appropriately equipped USA model. It is "a dead wire" in my Canadian HCH II. When my yet to be constructed assembly provides a desired pulse to the trunk solinoid, this green wire will be tapped to carry the signal to the back end of the car. The wire ends at connector 701, behind the back seat near the drivers side "C" pillar....
More to follow....
Today, I want to brief how one can tap into the car power supply. My technique will be as follows...
In the above photo, I have removed the lower drivers side instrument panel trim part to expose the under-dash fuse/relay box. I have attached some green tape with ink labels to clarify where one can tap into the existing electrics for this modification.
All taps for this project (except assembly ground) shall occur here.
I have also added some labels and arrows electronically to the photo.
I'll deal with the "Hot at all times" (light green connector D with 2 cavities, the white wire) and "Hot in ACC and ON" (light green connector C with 4 cavities, the red wire) wires at a future date.
Below, is the detail view from the shop manual of the large 42 cavity light green connector shown above....
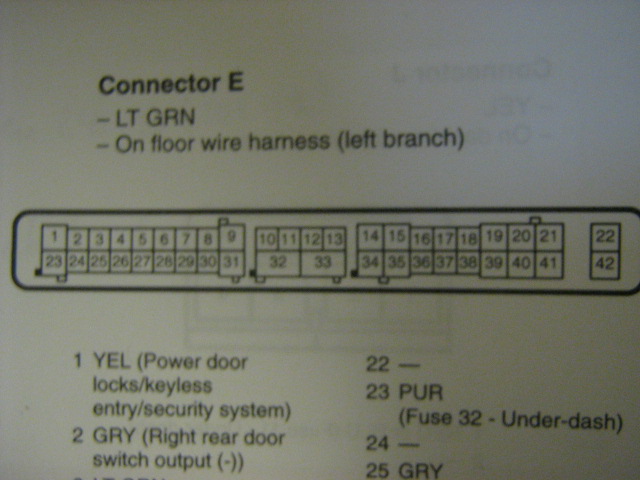
In the top photo, I have tagged the following wires of interest on the light green colored connector "E"....
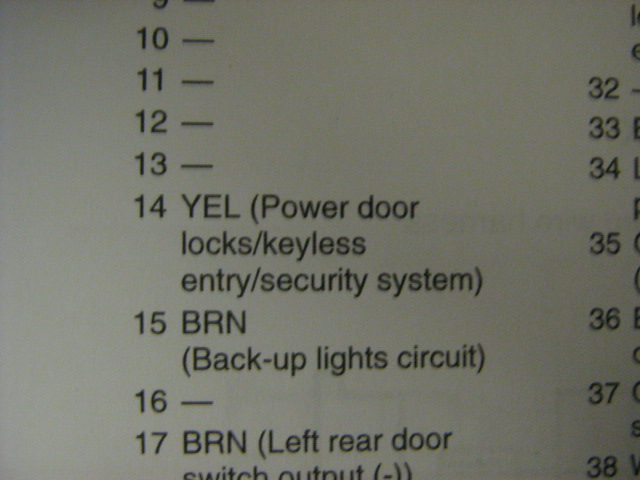
Cavity 14 is the yellow wire that is the 2nd "unlock" pulse from the keyless entry remote fob. I will eventually tap into this wire to power the coil of the number 3 relay (thru my yet to be constructed assembly) that provides a pulse for the (yet to be purchased) Honda OEM trunk lid solenoid.
Cavity 21 is the blue wire that carries the "lock" pulse from the keyless entry remote fob. I will eventually tap into this wire to power the coil of the number 2 relay/DEI 528T (thru my yet to be constructed assembly) that PREVENTS a pulse from reaching the (yet to be purchased) Honda OEM trunk lid solenoid.
Also note Cavity 20, USA:GRN. This is the wire that would carry a pulse to the trunk solenoid from the MICU in an appropriately equipped USA model. It is "a dead wire" in my Canadian HCH II. When my yet to be constructed assembly provides a desired pulse to the trunk solinoid, this green wire will be tapped to carry the signal to the back end of the car. The wire ends at connector 701, behind the back seat near the drivers side "C" pillar....
More to follow....
Ridiculously Active Enthusiast
Joined: Nov 2008
Posts: 729
From: Coquitlam BC, Canada (Greater Vancouver area)
I know I've gotten into things like this myself, but,: how much have you invested in this so far? I mean, do you think it's worth it?
Thread Starter
|
Active Enthusiast
Joined: Nov 2009
Posts: 210
I know I've gotten into things like this myself, but,: how much have you invested in this so far? I mean, do you think it's worth it?
For me, its worth it as I want to pop that trunk and not have to unlock it with the key when the rear end is covered in winter salt/dirt and my hands are full.
Besides, as a retiree, I like the challenge of wiring this in so that it is "like an OEM product".....
Cheers
Mike
Ridiculously Active Enthusiast
Joined: Nov 2008
Posts: 729
From: Coquitlam BC, Canada (Greater Vancouver area)
Yeah, I know the feeling of a challenge like this, as I said, I've gotten drawn in myself a few times. A lot of times though I "rein myself in": it's tempting, but I don't want the hassles, possible gotcha's, etc, etc.
I believe the new models have this. How long till trade-in time?
I believe the new models have this. How long till trade-in time?


